Saturday, March 6, 2010

Facebook Photo Browser: SlickPhoto

Ok, so the Facebook folks have cleared up the problems I was having publishing an app I wrote, and I thought I'd do a quick writeup to announce it.  It's a relatively simple app for viewing your friends' albums.  I had one main goal:

View all your friends' photos without having to load multiple webpages 

Facebook is particularly frustrating for me in that every photo is on its own web page.  It's good because they can load new ads for you, but awful for a person who want to take a quick look through an album.  So I put together an app I named SlickPhoto:


I wrote this app in Flex, which means it's a Flash app.  Now, it started with a single goal, but I ended up with some features that are worth noting:
  1. Download any Facebook album as a zip file - Good for Facebook stalkers ;)
  2. Slideshows - View any album as a slideshow
  3. Full Screen Mode - Both browsing and slideshows can be viewed in full screen mode.
  4. Link to albums - You can create a link that will load directly into an album you want to view in SlickPhoto.  You can email this link to your friends so they can go directly into SlickPhoto to look at your album.
It's a relatively simple interface, so you can jump right in by going directly to SlickPhoto, or you can view the application profile before you start using it (although there isn't much there at the moment).  Note that SlickPhoto, like all my other Flash-based apps, has a form for submitting bugs so if you run into any problems feel free to contact me that way.

Now, if I could just figure out how to add search tags so people can find it easier through the Facebook search interface....

Sunday, February 7, 2010

Facebook App Directory, Possible Frustrations

So I recently wrote a Facebook app for browsing photos.  You can try it here if you'd like.  It was mostly an experiment to learn about what it's like to go through the whole process of getting an app into the Facebook app directory.  Well, my app has been "approved", but I haven't made a post about it on my blog yet because it still hasn't actually shown up in the Facebook app directory.  It's been approved for oh, I dunno, two months now?

I browsed the Facebook dev forums and came across a couple threads about this problem.  This has been going on for a while.  There are posts from the Facebook admins about it being fixed, and replies saying "no, it isn't".  This has been going on for quite a while (over a year based on one of the threads).

I find it very interesting that such a popular thing has been broken for so long.  I'm lucky since I don't have any monetary interest in getting my app on the directory, but I can imagine this being a serious problem for people who make a living on Facebook apps.  Perhaps the higher profile apps get better service and haven't run into this problem.  I dunno.

At any rate, I thought I'd make a post about this to pass the time while I wait for my app to show up in the directory.  Once it's up there, I'll go over the features and make it official.

Tuesday, January 26, 2010

MM Ticker Browser 0.2

A while back, I posted a tool for researching stock tickers. Well, after that post I went back into the code and added some functionality for saving preferences. Also around that time, my daily stock watching drifted into just checking the indexes, and that code was forgotten... until today!

I got a request for the source code to MM Ticker Browser, and since my subversion repository no longer has the old code, I figured I'd make an official post about it. I never got around to testing or using the preferences code much, so it may have a couple bugs. That's why there's a bug reporting interface in it :D.

So here's what I've posted:

Remember, this in an Adobe Air app, so you'll need to get Adobe Air.

... and just in case you have problems with this version, you can always use MM Ticker Browser 0.1.

Monday, November 23, 2009

Photo Gallery Maker 1.1

I was working with Photo Gallery Maker recently and decided it needed a bit of an update.  Key changes are as follows:


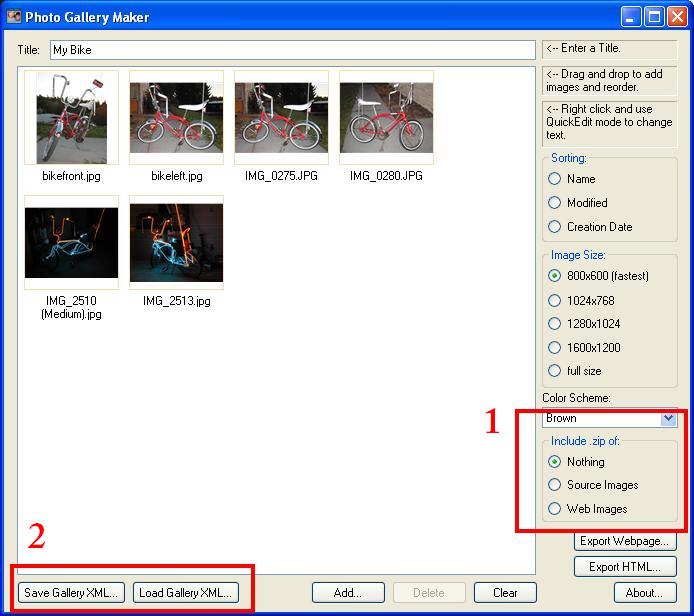
  1. You can now have Photo Gallery Maker include a .zip file of all the photos in your gallery.  If you do this, there will be a "download all photos" link in the title bar allowing viewers of your gallery to download the photos.  You can include the original photos or the resized versions in the .zip file.
  2. You can now save and load your gallery as xml.
  3. I've adjusted the look and feel of the full size image (shown when you click a thumbnail).
  4. You can now view the images in a slideshow.  A slideshow control panel is shown if you mouse over a full size image.
I've also fixed a few bugs:
  • There was a nasty memory leak in the image processing code.  If you were working with large images, it would most likely run out of memory.
  • Drag and drop should drop to the correct position now.  It was off by one in certain cases.
  • If one of your images was sufficiently tall, it would overflow onto the caption.  I've fixed this by causing the thumbnail to get squashed if it's too tall.  The full size version remains unchanged.
This build includes a library called SharpZipLib, which is available under the GPL.  As such, source code is not included in the installer (you won't notice it unless you're trying to).  A file called source.zip contains all source code, and it is copied into the Photo Gallery Maker folder in Program Files.

Nab this new build here (1.1 MB).
For more info on Photo Gallery Maker, see my post about version 1.0.

Monday, September 28, 2009

Facebook API: Going Full Screen with Adobe Flex

I've recently been checking out the Facebook API and doing some experiments with the Facebook ActionScript API. It's relatively straightforward to use, but as I've found with other Adobe products, is a little lacking in documentation. Using full screen mode is one of those things. If you do a Google search for it, a lot of results talk about how it isn't possible, but I've sorted it out, and here's what I did to get it working.

First off, you'll notice on the Adobe documentation that full screen mode is supported only if you're using Iframe content and not FBML. This is the only place I found where it is indicated that it IS in fact supported. I couldn't find any example code on the subject.

Secondly, I went through the Adobe tutorials for Creating a Facebook app and then Deploying your Facebook app. Jeanette's coding style makes me crazy, but the examples are easy to work through.
After the tutorials, you're 95% of the way there. We have to make two changes, the first is to add support to your Flex app to switch to full screen mode, and the second is to change your canvas page to enable full screen mode.

Changes to your Flex App
You'll need to add the ability to switch into full screen mode. This is very simple, and is documented pretty well here. What I did was add a button with a handler that set the stage display state:

ActionScript code
private function toggleFullScreen():void
{
try
{
switch (this.stage.displayState)
{
case StageDisplayState.FULL_SCREEN:
this.stage.displayState = StageDisplayState.NORMAL;
break;
default:
this.stage.displayState = StageDisplayState.FULL_SCREEN;
break;
}
}
catch (err:SecurityError)
{
// ignore
}
}

mxml code
<mx:LinkButton x="534" y="4" label="FullScreen" click="toggleFullScreen()"/>

Changes to index.htm
This was the part I found a little tricky. My HTML/JavaScript skills are a little lacking, so I had to do a bit of reading to sort this out.

The index.htm you end up with at the end of the Adobe tutorial allows you to debug your app AND deploy it to Facebook using the same html. This is useful compared to the default html Flex Builder generates, which always opens a second web page to allow the user to log in. This is all good, except the index.htm you end up with uses swfobject.embedSWF instead of the Adobe generated <object> and <embed> and tags people are probably used to. Enabling full screen mode in the Adobe default html template is documented here.

To enable it using swfobject.embedSWF, you have to pass it as an argument to the javascript function. It seems obvious at first, the you'd just set flashVars.enableFullScreen to "true" and be done, but that doesn't work. The enableFullScreen flag is set in the params argument, not the flashvars argument. So what you started with:

swfobject.embedSWF("helloUser.swf", "flashContent", "100%", "100%", "9.0.0", "expressInstall.swf", flashVars);

Ends up being:
var params = {};
params.allowfullscreen = "true";
swfobject.embedSWF("helloUser.swf", "flashContent", "100%", "100%", "9.0.0", "expressInstall.swf", flashVars, params, false);

That's the key really. I fought with the parameters a bit before figuring out that I was setting enableFullScreen in the wrong place. I makes sense after looking through the swfobject documentation and comparing it to the index.template.html, but it's not obvious to folk like me who sometimes struggle a bit with HTML and JavaScript.

Now when you run your app in debug mode or on Facebook, it should switch into full screen mode when you toggle it, rather than doing nothing (as I was having it to for quite a while).

Sunday, September 27, 2009

Character Builder 1.3 known issues

I've gotten a few emails through my issue submission from in the Character Builder, and I thought I'd jot down the current list to keep track of things. I'm not sure when I'll get to fixing things, but I'll be sure to post when I do (and the builder will be updated as well). What I've got so far are the following problems:
  • Druids begin with three at-will attack powers, but this is not reflected in the builder. For now, you'll have to put them on your Character Sheet manually.
  • Armor Proficiency (Plate) is missing.
  • Potent Challenge is missing.
  • When manually entering ability scores, you are not given the ability to add stat points if you level up. I may leave this as is, since manual entry was originally intended to be 100% manual.
  • Stats on the final character sheet (PDF) may be incorrect. Make sure you double-check them.
  • On the PDF, it appears that only the 1/2 lvl value is factored into ATT BONUS in the Attack Workspace.
Feel free to post additional issues in the comments section here.

Friday, August 14, 2009

D&D Character Builder Update (1.3)

Work has been busy these last couple month, but I managed to get my D&D Character Builder updated with the Player's Handbook 2 races and classes. It might be a little rougher around the edges than previous versions, so I've also added a button titled "Got and Issue?" where you can drop me an anonymous email detailing any problems you encounter. Other changes include:

Major Changes
- PHB2 classes and races.
- Submit an issue button. If you find something that ain't quite right, let me know about it!
- I reworked the skills, feats, and powers page. Make choices on the left, see what you've chosen on the right.
- A "to-do" list is available (click the "To-do list" button) that tracks choices you still have to make. If you select on of the listed choices, it will give you more information. If a choice can be made immediately (like for languages), it will give you a little selection box. If not, then you can double-click the choice to have the UI highlight the section you need to make a choice in.

Other Changes
- The code behind the scenes is much more aware of the bonuses you've chosen. I spent some time adding code to fill out the character sheet a bit more based on these bonuses. You'll see modifiers properly applied to your skills based on feats you choose, for example.
- Languages you choose are filled in on the character sheet.
- Changed the name to "builder" instead of "Generator".
- Powers, feats, and classes are sorted alphabetically now.
- Half-elfs can now choose human feats.
- Added a "license" agreement. This thing is free, but I may as well put it in writing.
- There's a donate button in the About box now. If you like what you see, your support is appreciated.
- I've also added lots more new bugs. Pats on the back to those who find them first.
- If you'd like to use older versions, a link is provided in the Change Log for the version of interest (you can get to the change log from the About box). Previous versions have a "Use this version" link to allow you to go to an older version.

That's about it. I'd like to sort out a better way to create a character sheet in PDF form, so if anyone has suggestions, drop me a line. XFDF doesn't seem to be well-supported by Adobe.

Access the new Character Builder (1.3) here.

Monday, June 15, 2009

Web Browser Experiment / Ticker Symbol Power Browser

I've recently been doing a lot of research on stocks. MACD, Bollinger Bands, volume, trend analysis, moving averages, the list goes on. As I've been browsing around, I've gotten used to one site for one statistic, another for something else, and I've ended up with a bunch of sites that TOGETHER give me what I feel is enough information to make a decision about a stock. It's pretty interesting stuff, but it's just such a doggone pain to have to open 4 different browser windows just to be able to tell if I'm interested in a stock or not. It takes too long to keep up with, for example, a live chat where people are pointing out ticker symbols to look at.

So I was frustrated with this situation last Wednesday and I decided I'd do something about it. What I came up with is this:


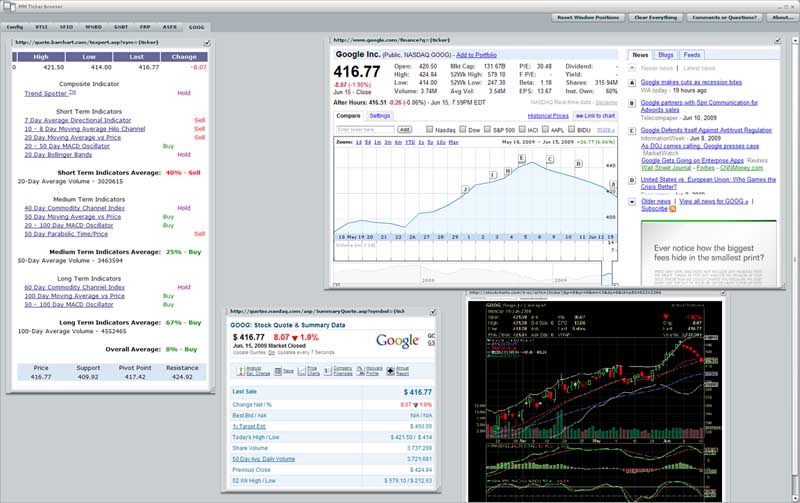
It's a Multi-Tab, Multi-PAGE Ticker Browser. And since I'm not feeling a snazzy name, MM Ticker Browser for shorter, and MMTB for short. It's more of a tool for myself than anything, but all the people I've shown it to think it's pretty neat, so I thought I'd package it up in the case anyone wanted to use it. Here's the rundown:

The General Feature List:
  • It is designed to show you multiple web pages in a SINGLE TAB.
  • It shows you multiple tabs in a single window, like we've all grown accustomed to.
  • All window positions, sizes, and scroll positions are saved automatically so it all comes back if you need to restart.
  • SCALABLE windows! If that's chart is too big, scale it down a bit!
  • All windows are resizable and movable. Web pages can hide their scroll bars to save space once you've got your scroll position locked in.
  • You can add multiple notes to each page (really useful if you're trying to sift through a bunch of tickers).
    Now here's where it gets tricky,
  • A pseudo-templated window layout. Each ticker symbol you enter will get its own tab, in which it will contain all the same websites for the chosen ticker. This is probably better understood in an example. I'll show you below.

You'll need:
What to do:
  1. When you first start it up you get a window like this:

  2. This is the config page, where you specify the URLs for the web pages that show you your ticker information. Incidentally, you also specify ticker symbols here. This page is also used as place you can load up web pages that give an overview of the market, and you can even log some notes for yourself to help remember things.

    If you want to remove something from one of these windows, click it with the mouse and press delete. Any tabs or windows associated with it will be deleted.
    • Local Windows: This is where you enter urls for web pages you want shown on the config page. Paste "http://www.google.com/finance" into the text box and press enter. It will add a new window to the config page that loads the google finance main page. You can move it, resize it, and scroll around in it as you need. It's position, size and scroll position will be saved. try zeroing in on the DOW/S&P/NASDAQ chart in this window. Now click the checkbox in the upper right hand corner. This will remove those pesky scroll bars.
    • Ticker Symbols: This is where you enter the ticker symbols you're interested in. Each ticker symbols will get its own page of information. Enter "GOOG" in the text box and press enter. Notice the tab that shows up? If you click it now, it won't have anything on it. That where the Ticker URLs come in.
    • Ticker URLs: This is where you enter the URLs of the websites you use for research. In order for it to work, though, you have to let it know where the ticker symbol should be inserted into the url. For example, I can look at the GOOG ticker at "http://www.google.com/finance?q=GOOG", but this URL will be used for every ticker symbol you enter. So you have to replace every occurrence of the ticker symbol in the URL with "{ticker}". Enter "http://www.google.com/finance?q={ticker}" in the textbox and press enter. Now click the GOOG tab. A window has been added with the google finance webpage for GOOG!

      If you enter another ticker, say MSFT, into the Ticker Symbols list, it will be given its own tab, and it will load up the google finance ticker page for MSFT.
    • You should have something like this now:


  3. Here's the cool part. On the GOOG tab, resize the google finance window. Now go to the MSFT tab. Your changes are replicated here, and on any other ticker tabs you might have. You're essentially live-editing a window layout that is applied to each ticker tab.
  4. Charting web sites are just as easy. On the config page, add "http://stockcharts.com/h-sc/ui?s={ticker}" (note my usage of "{ticker}")to the Ticker URLs list. A window for this URL is added to both the GOOG and MSFT tab. You can adjust it, move it around, and lock down the location of the chart.

    But suppose you also like the information at CNBC, "http://data.cnbc.com/quotes/{ticker}"? You're starting to run out of real estate now. You could go get a bigger monitor, OR you could just scale some of the windows down by right clicking the window header, turning this mess:

  5. using a scaling factor:
    into THIS:
  6. And lastly, should you want to jot something down to help yourself remember a chart trend or date or whatever, you can right click in the background of any tab and click "Add Note Window". This will plop a note window under your mouse where you can write some text for later. Note windows are note replicated across tabs, so you can add specific notes for each ticker. Add some notes to your config tab, too. I like to track a list of ticker symbols I've look at and decided I don't like.

That the general usage. You'll also notice some other options on right click menu where you found the scale option
  • Refresh - Just in case you need to do a hard refresh.
  • Reset Position - This move the window back to its original position. If you accidently drag the header off of the page, you can right click the border of a window to show the right click menu, choose this option, and recover your window.
  • Open in Browser - Loads the URL being displayed into a REAL browser. For those time when you just want to go back to a normal web page.
And there are some button in the top right of the main window.
  • Reset Window Positions - If you've really lost track of your windows, this will move them all back to the original position. Don't click this unless you want to have to reposition everything.
  • Clear Everything - Deletes ALL your preferences. Ticker symbols, URLs, notes, all of it. gone forever. Good if you just want a fresh start.
  • Comments or Questions? - Drop me a line through this dialog. Bugs, comments, questions, anything. When you click submit, it will send an email to my special MM Ticker Browser email. I'll do my best to reply promptly.
  • About - My general about box. There's also a change log in here, but it's mostly empty. I've used this dialog in another app, and with flash, I can link back to previous versions if you need them. Look for those here if I make and update you hate.

And finally, a few caveats:
  • This is thought experiment turned tool turned thought experiment (yes, I meant to say that) on my part. There is most likely a bit of instability on account of that fact.
  • I suggest not logging into any extra personal websites with this tool (definitely not your online trading account). I don't know much about security, but my guess is that the browser windows it shows are less safe than normal internet browsers.
  • Since this is written using Adobe Air (flash), its bound to turn into a memory hog if you give it the chance. I don't usually have more than about 8 or 10 tickers loaded at any one time. Note that each tab only loads when you click on it, so adding a bunch of ticker symbols on the config page won't do anything until you start clicking on the tabs.
  • And if you see a crash, don't panic! It automatically saves your preferences every 15 seconds, so you shouldn't have lost any work.
And once more, for those who scrolled straight to the bottom:
You'll need:
Enjoy!

Wednesday, April 15, 2009

Photo Gallery Maker

In my last post, I mentioned I'd be posting tool to create a simple photo gallery. Well, I finished it earlier than I expected. I'd like to talk about the workflow I designed it around, though, before just throwing a link out.


How To Use It

To use my tool, you'll need the following:
  1. Microsoft .NET framework 3.5 installed. If you don't have this, you can get it here.
  2. A website (or an http server) where you can post a folder full of files.
  3. Some photos you want to post online.
The general use case is as follows:
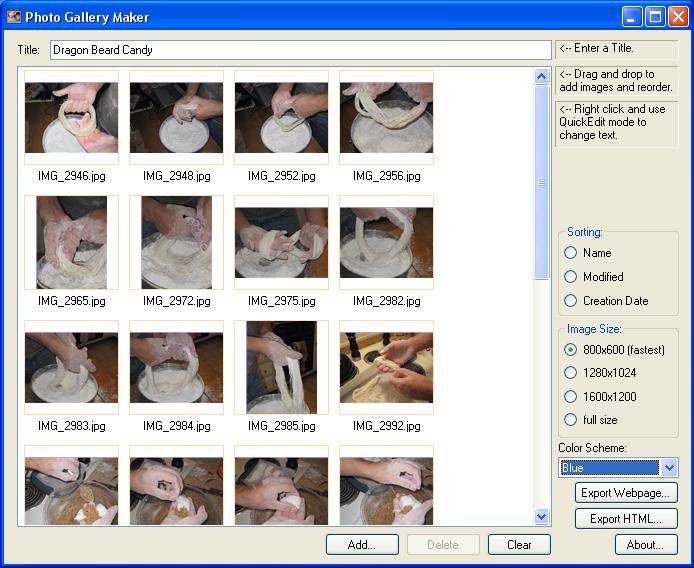
  1. Open up Photo Gallery Maker.
  2. Enter a title for your gallery in the title box.
  3. Drag photos into the large empty listbox. Reorder as necessary using Drag and drop or the sorting options available.
  4. Choose a color scheme.
  5. Click "Export Webpage", specify an output folder, and click ok. At this point, the app will generate thumbnails and web ready images from your source pictures. It will also copy the necessary CSS and JavaScript files and generate the html for you.
  6. Once generation is complete, copy your destination folder to your
    website. You can then link to the http path of the folder on your website to
    view the gallery.
For example, if I generated the folder "photos" on my computer, and copied it to /www/galleries on my website, then I'd link to http://www.lukerymarz.com/galleries/photos or http://www.lukerymarz.com/galleries/photos/index.html.
Other Features

Now, there are a few extra features I overlooked.
  1. You can double click an image or select it and press enter to change the caption displayed under the thumbnail in the web page. You can alse do this through a right click.
  2. If you'd like a faster way to enter captions, select and image, right click it, and choose "Begin Quickedit Mode". This will allow you to enter a caption for the current image. When you press enter or tab, the edit focus will move to the next picture and you can enter it's caption. This will continue until you've entered a caption for all the images or clicked the mouse somewhere else.
  3. By default, the full size image will be 800x600. You can choose a few different sizes in the "Image Size" group on the right side of the app. 800X600 is fastest with HighSlide, but sometimes you just want a higher resolution.
  4. If you need to regenerate the html or choose a different color scheme for your gallery, but you don't want to regenerate all the images, you can use the "Export HTML" button. It will do just that (copy the highslide files, the current color scheme, and generate a new index.html). If you've changed the photos in the gallery, use this at your own risk!
CAVEAT: You must have the .NET Framework Version 3.5 installed for this to run. If it's not installed, you'll get an error message when you start it up.
Anyways, I found this pretty useful for posting galleries to my website to share with friends.
Photo Gallery Maker version 1.0 can be found here.
Photo Gallery Maker version 1.1 can be found here.  Read more about it here.
Drop me an email at lukerymarz@gmail.com if you have any questions.

A Proper Web Photo Gallery

I don't know if I'm the only one, but I've yet to see a photo gallery in a web page that I like.  The primary problems are:

1.  I don't want to have to press the back button every time I look at a picture (like facebook, for example).  To that end, the whole gallery (thumbnails and full size images) should be contained on a single page.
2.  I want it to load fast.
3.  I want to have it look nice.
4.  Each picture should have room for a short description.
5.  It should resize to fill the browser window with thumbnails (so you can treat it much like a thumbnails view in Windows Explorer).

Rather than complain about it, though, I thought I'd make something I was satisfied with.  Well, I worked with my girlfriend to put one together (She's learning HTML and needed a project).  Here's a sample of how it turned out.

I used Highslide for the fancy javascript transitions.  It's a really nice kit that plugs in easily.  The only issue I had with it was because I had defined a style for img elements.  The fix was to... not do that, define class that each image could use (for example class="imgThumb").

Anyways, this post is a heads up, because I wrote a tool to throw galleries like this together, and I'll be posting it soon.  More about that when I get there.

Thursday, April 2, 2009

Simple XNA Progress Bar

I recently needed a dead simple progress bar, where I could give it a display rectangle, min, max, and a value and show me something in game, but couldn't find anything online. I ended up writing it myself, and thought I'd share what I came up with.

My goal was to create a single file I could drop into a project to allow me to draw a progress bar. All the projects I found involved using a texture as a separate file. I knew from a previous project that you could create that texture in-memory using the Texture2D.SetData() function, and that's what I did.

I also wanted to provide a double border so I could put the progress bar on top of any background without having its border look invisible. If you've ever seen closed captioning disappear because of the background color, you know what I mean. But since not everyone needs a double border, I made sure you could turn it off.

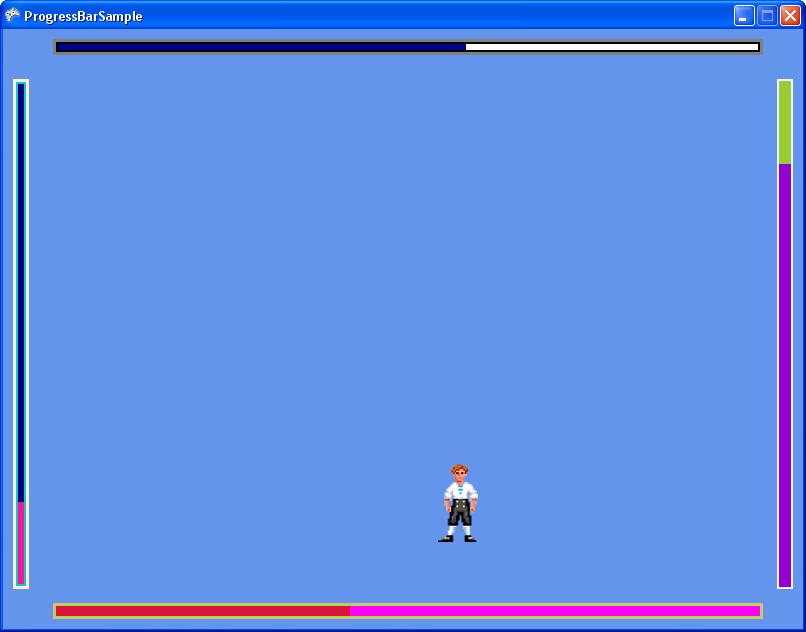
Anyways, here's and example of what you can do with the progress bar. (download the project for this at the bottom).


So the simple way to get a progress bar into your game is this:

1. Get the source code.

2. Add ProgressBar.cs to your XNA project. Note that I wrote this in 3.0, so make sure you're on that version or higher.

3. Create an instance of a progress bar in your game1 class;

UI.ProgressBar progressBar;

4. In your LoadContent() function, set it to a new progressBar, and provide the rectangle you want it to lie in. You can also set the minimum, maximum, and value member variables here. The defaults are 0, 100, and 0, respectively.

progressBar = new UI.ProgressBar(this, new Rectangle(10, 10, 300, 16));
progressBar.minimum = 0;
progressBar.maximum= 10000;

5. In your Update() function, update the value of your progress bar if necessary, and then call the progress bar's Update() function, providing the gameTime (gameTime is not currently used in the progress bar code, though).

progressBar.value = character.health;
progressBar.Update(gameTime);

6. In your Draw() function, call progressBar.Draw(), specifying a spriteBatch. Make sure you're already called SpriteBatch.Begin() before calling the progress bar Draw() function.

progressBar.Draw(spriteBatch);

And that's it!

Now, I've put quite a few customizable pieces in there. They are all commented in the progress bar code, in the "public members" region.

The one I'd like to talk about is the orientation. You can specify that the progress bar be vertical or horizontal, and in which direction it fill. This is specified at creation time in the ProgressBar constructor. See the orientation member variable for more info.

Here's a list of the public variables in there now:


float minimum - Minimum value of the progress bar. Default is 0.0f.
float maximum - Maximum value of the progress bar. Default is 100.0f.
float value - Current progress value.

Int32 borderThicknessOuter - Outer border thickness. This is drawn within the bounds of the progress bar. Default is 3.
Int32 borderThicknessInner - Inner border thickness. This is drawn within the bounds of the progress bar. Default is 2.

Color borderColorOuter - Outer border color. Default is Gray.
Color borderColorInner - Inner border color. Default is Black
Color fillColor - Color of the progress section of the bar. Default is Dark Blue.
Color backgroundColor - Color of the background (unfilled) section of the progress bar. Default is White.
Orientation orientation - Gets the orientation of this progress bar. Set at creation time.

Note that you should be careful with the border thickness values. I didn't add any checking to make sure the border isn't overcrowding the actual progress bar. You could theoretically have a progress bar that is all border if you set the thicknesses too big.

Ok, so here's a sample project. Hold space bar if you want to pause.

And here's the bare ProgressBar.cs file (zipped, of course).

Monday, December 8, 2008

QuickTime Player in Internet Explorer

I've recently been working on getting QuickTime player to work in Internet Explorer (and Firefox and Safari), and as you might expect there are some catches to getting a rich QuickTime UI to work with IE. By rich QuickTime UI, I mean a UI you've built yourself that embeds a QuickTime window. Furthermore, to keep your UI updated to the state of the player, you're using DOM events. I thought I'd do a brain dump to refresh my own memory and potentially help some others. So here we go:

Question 1: Why don't my DOM events work in Internet Explorer?

Answer: They work, but they don't work properly, that's for sure. The Apple documentation provides an example the just doesn't work. QuickTime DOM events won't get sent unless you add a [relatively simple] hack, the essence of which requires you to reload the clip you're playing. Pseudocode looks like this (in javascript):

load clip in QuickTime
wait until plugin status is loaded (or complete )

// begin hack
quicktimeMovie.SetResetPropertiesOnReload(false);
quicktimeMovie.setURL(movieURL);
registerDOMEvents(quicktimeMovie);
// end hack

So essentially, you have to generate your object/embed code, load the quicktime player once (by setting innerHTML somewhere), and then do a setURL with the same clip before registering for DOM Events. If you don't do the setURL, you won't get DOM events.

Note that for other browsers you don't have to do this. So I suggest you wrap this code up in an if(IE) block.

Question 2: With the hack above (in IE), why does my app hang when loading long (15 minutes plus) clips?

Answer: Your app is hanging because the QuickTime plugin didn't get time to stabilize before you called setURL. I didn't find a way around this, but a solid solution is to use a dummy clip (1 or 2 seconds of black) that you load up before loading your real clip. Once you've got DOM events registered, you can use setURL to switch to other clips. Pseudocode looks something like this:

function initQuickTime()
{
[code from answer 1 loading a dummy clip]
}

function loadClip(clip)
{
if(firstLoad)
{
initQuickTime();
}
quicktimeMovie.setURL(clip);
}

And you're good to go. setURL can be used from here on in if you need to switch clips.

Other Notes:

1. You can't resize the QuickTime window without reloading the clip. I really want to be wrong about this, but if you need to change the size of the video window, you have to redo your object/embed code. Kind of a pain, but resizing has to be done almost never, so it's workable.

2. If you're writing debug code, make sure all your test clips are on your http server. I made this mistake and wasted a couple hours. If, for example, you're working my pseudocode in question 2 and your dummy clip is on your PC, but your app accesses clips on an http server somewhere, it just won't work. QuickTime player has some initialization in it that defaults to either local files or http files (I don't really know the details).

That's about it. Overall I really like QuickTime player. Compared to the directshow work I've done, it's a lot easier to use. There are a lot less corner cases you have to deal with (if you're trying to get frame accuracy, for example). The compatibility issues in diffferent browsers come with the turf, and they're realtively easy to deal with elegantly if you know what you're up against.

Monday, October 20, 2008

Adobe XFDF

Adobe Xml Forms Data Format is an xml format that allows you to fill PDF forms.  I used this in my D&D character generator to allow for easy creation of a printable character sheet in PDF form.

I started with an editable PDF form.  Each field in an editable form has a name of some sort, and if you have access to Adobe LiveCycle Designer, you can view the fields as XML.  All you have to do is open the editable PDF in LiveCycle Designer and click View->XML Source.  This will give you a long XML list detailing all the fields in your form.

UPDATE 2008-11-13: I got an email from someone recently who was creating his editable form using LiveCycle Designer.  It turns out that if you use LiveCycle Designer to build your form, it won't work with XFDF.  If you want to use XFDF, you have to create the form using Acrobat.  LiveCycle Designer forms require that you use XDP (which I have never used).  You can read a bit more about the incompatibilities here.

To specify the values to go into an editable PDF, you create an XFDF file.  The basic format is this:

<?xml version="1.0" encoding="UTF-8"?>
<xfdf xmlns="http://ns.adobe.com/xfdf/" xml:space="preserve">
<f href="http://www.lukerymarz.com/files/CharacterSheet.pdf"/>
<fields>
  <field name="name">
    <value>null</value>
  </field>
  <field name="level">
    <value>1</value>
  </field>
  <field name="class">
    <value>Warlock</value>
  </field>
  <field name="race">
    <value>Tiefling</value>
  </field>
   ...
   ...
   ...
</fields>
</xfdf>

You put this in a text file with an xfdf extension and when you open it, it will reference the pdf in the <f> field and fill in the specified fields.  

So how do you get from the XML LiveCycle Designer gives you to the actual xfdf data.  Well, I didn't want to type a bunch of repetitive lines for each field in the form, so I wrote a little tool to take the LiveCycle xml and spit out ActionScript.  My tool opens the LiveCycle XML, parses each field, and provides a listing with the field type.  It then converts each field to ActionScript code that will append to a string in a my output function.  All I did then was copy the ActionScript code, fill in the specific piece of data for each field (for example, currentCharacter.name for the "name" field), and the output was done.  

There are two caveats I ran into, and the first has to do with spaces.  For each field, the name of that field in the LiveCycle XML has an underscore where a space is.  In the XFDF XML you generate, those underscores need to be replaced with an actual space, otherwise your field won't get filled in.  

The second caveat has to do with arrays.  For example, a part of the ActionScript code my tool generated looks like this:

xfdf += '<field name="class_feature.0"><value>' + Database.Data.currentCharacter. + '</value></field>';
xfdf += '<field name="class_feature.1"><value>' + Database.Data.currentCharacter. + '</value></field>';
xfdf += '<field name="class_feature.2"><value>' + Database.Data.currentCharacter. + '</value></field>';
xfdf += '<field name="class_feature.3"><value>' + Database.Data.currentCharacter. + '</value></field>';
xfdf += '<field name="class_feature.4"><value>' + Database.Data.currentCharacter. + '</value></field>';
xfdf += '<field name="class_feature.5"><value>' + Database.Data.currentCharacter. + '</value></field>';
xfdf += '<field name="class_feature.6"><value>' + Database.Data.currentCharacter. + '</value></field>';


This is an array of class features.  You'd think you could just go through the list, creating:

  <field name="class feature.0">
    <value>sample feature 1</value>
  </field>
  <field name="class feature.1">
    <value>sample feature 2</value>
  </field>

But that is incorrect.  Since this is an array, you have to represent it as one in the xfdf.  The actual output would look like this:

  <field name="class feature">
    <field name="0">
      <value>Eldritch Blast:</value>
    </field>
    <field name="1">
      <value>Edlritch Pact: Choose Fey Pact, Infernal Pact, or Star Pact.</value>
    </field>
    <field name="2">
      <value>Prime Shot: If you are closest to your target, +1 to attack rolls</value>
    </field>
  </field>

And that's it.  If you reference a pdf on a website, you can send only the xfdf to your user, and as long as they have access to your website, when they open the xfdf, Adobe will take care of the rest.  Pretty neat, once you get past the catches.

Saturday, October 4, 2008

XML schemas, Excel, and getting what you want

In my character generator, there is a lot of data.  There's races, classes, skill, feats, and powers.  On top of that, they're not static lists.  Wizards of the Coast (and other people) are always adding and expanding on everything.  With that in mind, I knew I needed to have all that data extensible in my character generator.  XML is the obvious choice, especially since Flex is so good at parsing it.

But how was I to get the data in the PHB into XML in the easiest way possible?  Microsoft Excel and XML Schemas is the answer.  The basic idea is that you enter all your data into Microsoft Excel as a big list.  Then you tell Excel to export it as XML.  That XML is then fed into the Flex app.  

XML schemas tell Excel how to format the XML you export.  With an XML schema, you're defining the basic format of your XML (in XML, ironically).  There's an article here that gives a good way to create a simple Xml Schema Definition (XSD) using Excel (see step 6, specifically).  That will give you the schema, and then you can attach that to your Excel spreadsheet and have Excel export XML for you.

But there's a HUGE caveat.  Excel cannot handle (that is, export, import, deal with at all) XML with a list of lists.  This looks something like this:

<feats>
  <feat name="a">
    <prerequisites>
      <prerequisite name="x"/>
      <prerequisite name="y"/>
    </prerequisites>
  </feat>
  <feat name="b">
    <prerequisites>
      <prerequisite name="p"/>
      <prerequisite name="q"/>
    </prerequisites>
  </feat>
</feats>

We've got a list of feats, each containing a list of prerequisites.  The issue, specifically, is that we have many elements.  Now, if you think about this, it makes sense.  Excel allows you to easily edit a two dimensional array of data.  More than that and it gets complicated.

The solution I went with to get around this (because I require being able to add and remove from various lists of data, and it makes the XML easier to read) is to make use of the really good XML functionality in Flex.  My solution works like this:

1.  enter you data in Excel.  any time you have a list of things, enter them as a single cell and separate each "thing" with a comma.
2.  export to a simple xml format.
3.  feed the xml into a Flex app that takes the XML and converts any comma separated lists to a proper XML list.

A sample of this is here.  My flex app takes a list of feats I exported from Excel (shown on the left side), and then prints the proper XML for me to save to a file (shown on the right side).  There's now an extra step if I update my Excel spreadsheet, but it's better than having to edit XML all day long.

Unfortunately, I don't know of a way to get Flex to do magic things with XML schemas, so the dream app of being able to give one XML format and export another is still off my radar.  Also, you are effectively writing your XML schema in Flex code, so if you need to make a schema change, it's instead a Flex code change.  This is not necessarily bad.  I feel more comfortable making changes in code instead of in fancy XML schema editors.

Now, I've heard that Altova makes a really nice application that can handle lists of lists, but I haven't tried it (and the price is outside my budget).  Something for next time, I suppose.  For now, I've got a "good enough" solution for tricky XML, and it will be easy to update in the future if I need to.

Saturday, September 20, 2008

Character Generator update

I've updated the Character Builder. I added a changelog that tracks the changes I've made. It's accessible from the About box (click the top right button in the app).

I made a fix for the healing surges not showing up, and I fixed a bug that was keeping humans from getting their bonus skill, feat, and power.

Friday, September 19, 2008

bugs in Generator

There seems to be a bug in the healing surges calculations on the character sheet. I'll take a look sometime this weekend. I'll also look at the character sheet and see if I can get, for example, the damage and attack workspaces to show blank instead of Zero so they can be filled in with a pencil.

Wednesday, September 17, 2008

D&D Character Generator

UPDATE 2009.08.14 - I've posted a new build with PHB 2 races and classes, and a handful of new features. See the details here.

UPDATE 2009.04.01 - You will need Flash 10 to run this now. I've updated the "view as PDF" functionality so it uses the new Flash 10 feature to create files on the fly. It doesn't have to ask my server to create the file anymore. Hooray! I've also changed the size a bit. See the change log in the about box for more info.


Ok. I've FINALLY finished a project I've been working on for the last couple months. I've been giving it about two 4 hour sessions a week, and [AT LAST!] I'm satisfied enough with it to post it.

It's a character generator for Dungeons and Dragons 4th edition. I got the books in July when they released the set, and I thought it would be fun to put together a character generator that made it a bit easier to parse the whole thing.

This bad boy is written in Flex, so you can run it from any web browser with Flash 9. The general idea is that you build your character through the flex interface, and when you're done, click the "View as PDF" button and out pops a nice PDF for you to print out. It DOES NOT replace the Player's Handbook in any way. It's more of an easing function on the whole ordeal.

Use the app here. You'll need Flash 9. Don't forget that you can drag and drop your stat numbers in the Standard Array and Roll entry types. I haven't yet figured out a good way to indicate that they're draggable, as the Flex "useHandCursor" flag doesn't see to work.

Here's a list of caveats / known flaws / things that aren't implemented:

- THIS DOES NOT REPLACE THE PLAYERS HANDBOOK.

- choosing of equipment is not implemented. You'll need to use the PHB after you print your PDF.

- Half-Elf: after creating the PDF, be sure to choose an at-will power from another class for the dilettante race feature.
- Ranger: After creating the PDF, choose Dungeoneering or Nature as a skill. This will affect your modifier for the skill by 5 points, so don't forget!
- There appears to be an error in the class listings in the Player's Handbook. When a skill is automatically given (listed as "free" in my UI), it is also listed as a choice. In my code, I automatically remove the free skills from the choice list.
- I have not implemented languages. choose them on the PDF.
- Human: you get +2 to an ability of your choice. Do this on the PDF.
- The PDF has some fields that automatically fill as Zero. If there are certain ones you think should not be filled at all, let me know and I'll fix them.
- certain class and race features require you to choose between two things. In cases where this is not implemented, it is listed on the character sheet as a "choose x or y" listing under the class/race features sections.

UI bugs:
- there's a minor glitch in the positioning of the strength stat when you drag a number on top of it (only seen in the Roll entry type).
- Powers have no descriptions. They're intended to not have power descriptions, but they're supposed to say "See Player's Handbook".

Note that I got the character sheet pdf I'm currently using from here.

This was a very fun little project. I enjoy writing apps in Flex. In working on this, I learned about XML schemas, XFDF (a pdf format), and some Perl tricks I'm currently using on my server. I'll make some posts soon about all that stuff. I wrote some helper Flex apps that I'll post as well.

Friday, May 16, 2008

On Other Projects

I haven't made a post in the last two weeks because I've been working on another top secret project. I'm guessing it will take another two weeks of my time, and then I'll start posting some more stuff here. 'Til then...

Thursday, May 1, 2008

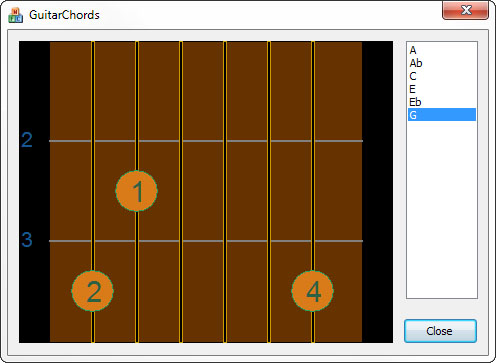
A Custom MFC Control to Display Guitar Chords

Recently, I've tasked myself with learning a bit more about custom MFC controls. For a hands on project, I chose to create a custom MFC control for displaying guitar chords. The basic steps of creating custom MFC controls are this:

1. Create a class for your control, and inherit from a control similar to what you want to make. If nothing is similar, inherit from CStatic.
2. Override the OnPaint function to do your custom drawing.

Everything else is just MFC, although you have to be careful about redrawing. If you're constantly redrawing, you could get a bit of flicker.

To show your control in a dialog, you have do the following:

1. Add a Custom Control to the dialog.
2. Set the "Class" property of the custom control to the name of your custom class.
3. Make sure you register your custom class using the AfxRegisterClass() function. An example of this is in ChordDisplay.cpp.

In making this control, I learned something very important. If you can draw something with the CDC drawing functions, then do it that way. Bitmaps are easy enough to blit onto the Device Context, but if you need transparency or any fancy stuff, you're gonna be spending a good bit of time figuring it out (or searching for code that does what you want). I used 100% CDC drawing functions for my guitar control.

Here's a screenshot:


And, as always, my source code is here. The control can be told to draw a chord by filling a struct with some data. See ChordDatabase.cpp for more how to do that. An expansion of this would be to get a full database of chords that could be loaded from an xml file. I've only got a few chords here because it's just a sample to show the control.

Saturday, April 26, 2008

Farseer Physics

I've been playing with the Farseer Physics engine lately. It's a physics engine for XNA and Silverlight. I've been toying with the idea of a game involving spiderman-like web swinging. You have a character, and he can fire a grappling hook from either hand. He the uses this mechanism to swing about. What I've got so far is a box that can fire a single grappling hook and swing about the screen. It's taken me 3 hours or so to get this far (which i think is pretty quick), and I attribute the quick spin-up to how easy the Farseer engine is to use.

The only gripe i have is that it has basically zero documentation. And since this code has been around since 2006, I'm gonna guess no documentation is coming any time soon. The good news is they provide quite a bit of sample code, and the guy who wrote it seems to reply to just about every question people can think of on the codeplex boards.

Either way, i'm having some fun. I'll post some code when I get there.