Showing posts with label Graphics. Show all posts

Wednesday, April 15, 2009

Photo Gallery Maker

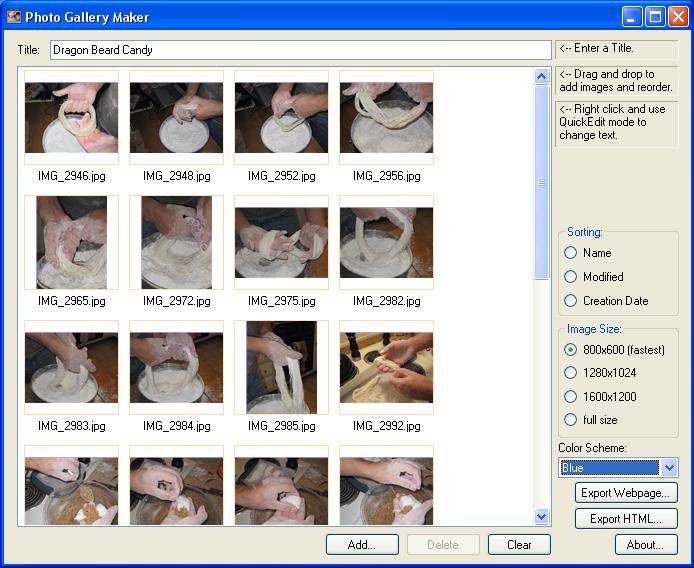
In my last post, I mentioned I'd be posting tool to create a simple photo gallery. Well, I finished it earlier than I expected. I'd like to talk about the workflow I designed it around, though, before just throwing a link out.


How To Use It

To use my tool, you'll need the following:
  1. Microsoft .NET framework 3.5 installed. If you don't have this, you can get it here.
  2. A website (or an http server) where you can post a folder full of files.
  3. Some photos you want to post online.
The general use case is as follows:
  1. Open up Photo Gallery Maker.
  2. Enter a title for your gallery in the title box.
  3. Drag photos into the large empty listbox. Reorder as necessary using Drag and drop or the sorting options available.
  4. Choose a color scheme.
  5. Click "Export Webpage", specify an output folder, and click ok. At this point, the app will generate thumbnails and web ready images from your source pictures. It will also copy the necessary CSS and JavaScript files and generate the html for you.
  6. Once generation is complete, copy your destination folder to your
    website. You can then link to the http path of the folder on your website to
    view the gallery.
For example, if I generated the folder "photos" on my computer, and copied it to /www/galleries on my website, then I'd link to http://www.lukerymarz.com/galleries/photos or http://www.lukerymarz.com/galleries/photos/index.html.
Other Features

Now, there are a few extra features I overlooked.
  1. You can double click an image or select it and press enter to change the caption displayed under the thumbnail in the web page. You can alse do this through a right click.
  2. If you'd like a faster way to enter captions, select and image, right click it, and choose "Begin Quickedit Mode". This will allow you to enter a caption for the current image. When you press enter or tab, the edit focus will move to the next picture and you can enter it's caption. This will continue until you've entered a caption for all the images or clicked the mouse somewhere else.
  3. By default, the full size image will be 800x600. You can choose a few different sizes in the "Image Size" group on the right side of the app. 800X600 is fastest with HighSlide, but sometimes you just want a higher resolution.
  4. If you need to regenerate the html or choose a different color scheme for your gallery, but you don't want to regenerate all the images, you can use the "Export HTML" button. It will do just that (copy the highslide files, the current color scheme, and generate a new index.html). If you've changed the photos in the gallery, use this at your own risk!
CAVEAT: You must have the .NET Framework Version 3.5 installed for this to run. If it's not installed, you'll get an error message when you start it up.
Anyways, I found this pretty useful for posting galleries to my website to share with friends.
Photo Gallery Maker version 1.0 can be found here.
Photo Gallery Maker version 1.1 can be found here.  Read more about it here.
Drop me an email at lukerymarz@gmail.com if you have any questions.

A Proper Web Photo Gallery

I don't know if I'm the only one, but I've yet to see a photo gallery in a web page that I like.  The primary problems are:

1.  I don't want to have to press the back button every time I look at a picture (like facebook, for example).  To that end, the whole gallery (thumbnails and full size images) should be contained on a single page.
2.  I want it to load fast.
3.  I want to have it look nice.
4.  Each picture should have room for a short description.
5.  It should resize to fill the browser window with thumbnails (so you can treat it much like a thumbnails view in Windows Explorer).

Rather than complain about it, though, I thought I'd make something I was satisfied with.  Well, I worked with my girlfriend to put one together (She's learning HTML and needed a project).  Here's a sample of how it turned out.

I used Highslide for the fancy javascript transitions.  It's a really nice kit that plugs in easily.  The only issue I had with it was because I had defined a style for img elements.  The fix was to... not do that, define class that each image could use (for example class="imgThumb").

Anyways, this post is a heads up, because I wrote a tool to throw galleries like this together, and I'll be posting it soon.  More about that when I get there.

Thursday, April 2, 2009

Simple XNA Progress Bar

I recently needed a dead simple progress bar, where I could give it a display rectangle, min, max, and a value and show me something in game, but couldn't find anything online. I ended up writing it myself, and thought I'd share what I came up with.

My goal was to create a single file I could drop into a project to allow me to draw a progress bar. All the projects I found involved using a texture as a separate file. I knew from a previous project that you could create that texture in-memory using the Texture2D.SetData() function, and that's what I did.

I also wanted to provide a double border so I could put the progress bar on top of any background without having its border look invisible. If you've ever seen closed captioning disappear because of the background color, you know what I mean. But since not everyone needs a double border, I made sure you could turn it off.

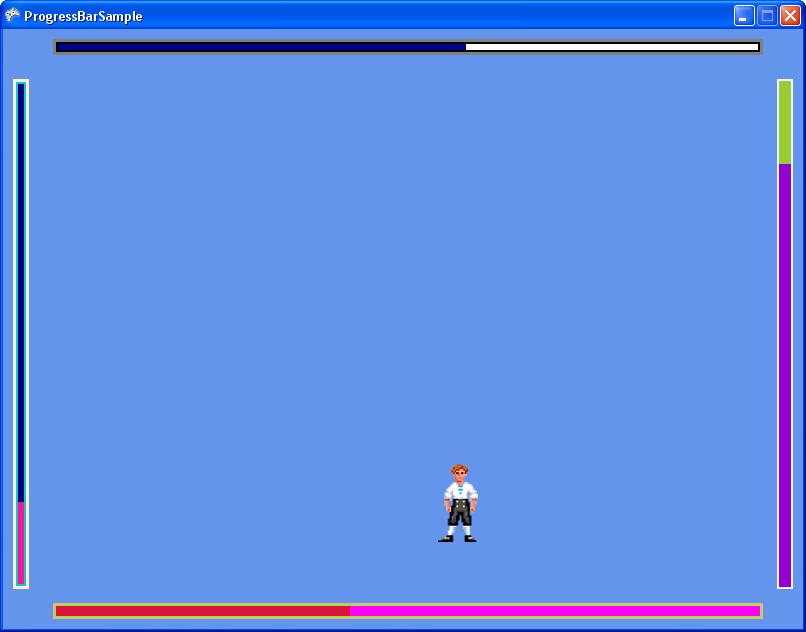
Anyways, here's and example of what you can do with the progress bar. (download the project for this at the bottom).


So the simple way to get a progress bar into your game is this:

1. Get the source code.

2. Add ProgressBar.cs to your XNA project. Note that I wrote this in 3.0, so make sure you're on that version or higher.

3. Create an instance of a progress bar in your game1 class;

UI.ProgressBar progressBar;

4. In your LoadContent() function, set it to a new progressBar, and provide the rectangle you want it to lie in. You can also set the minimum, maximum, and value member variables here. The defaults are 0, 100, and 0, respectively.

progressBar = new UI.ProgressBar(this, new Rectangle(10, 10, 300, 16));
progressBar.minimum = 0;
progressBar.maximum= 10000;

5. In your Update() function, update the value of your progress bar if necessary, and then call the progress bar's Update() function, providing the gameTime (gameTime is not currently used in the progress bar code, though).

progressBar.value = character.health;
progressBar.Update(gameTime);

6. In your Draw() function, call progressBar.Draw(), specifying a spriteBatch. Make sure you're already called SpriteBatch.Begin() before calling the progress bar Draw() function.

progressBar.Draw(spriteBatch);

And that's it!

Now, I've put quite a few customizable pieces in there. They are all commented in the progress bar code, in the "public members" region.

The one I'd like to talk about is the orientation. You can specify that the progress bar be vertical or horizontal, and in which direction it fill. This is specified at creation time in the ProgressBar constructor. See the orientation member variable for more info.

Here's a list of the public variables in there now:


float minimum - Minimum value of the progress bar. Default is 0.0f.
float maximum - Maximum value of the progress bar. Default is 100.0f.
float value - Current progress value.

Int32 borderThicknessOuter - Outer border thickness. This is drawn within the bounds of the progress bar. Default is 3.
Int32 borderThicknessInner - Inner border thickness. This is drawn within the bounds of the progress bar. Default is 2.

Color borderColorOuter - Outer border color. Default is Gray.
Color borderColorInner - Inner border color. Default is Black
Color fillColor - Color of the progress section of the bar. Default is Dark Blue.
Color backgroundColor - Color of the background (unfilled) section of the progress bar. Default is White.
Orientation orientation - Gets the orientation of this progress bar. Set at creation time.

Note that you should be careful with the border thickness values. I didn't add any checking to make sure the border isn't overcrowding the actual progress bar. You could theoretically have a progress bar that is all border if you set the thicknesses too big.

Ok, so here's a sample project. Hold space bar if you want to pause.

And here's the bare ProgressBar.cs file (zipped, of course).

Thursday, May 1, 2008

A Custom MFC Control to Display Guitar Chords

Recently, I've tasked myself with learning a bit more about custom MFC controls. For a hands on project, I chose to create a custom MFC control for displaying guitar chords. The basic steps of creating custom MFC controls are this:

1. Create a class for your control, and inherit from a control similar to what you want to make. If nothing is similar, inherit from CStatic.
2. Override the OnPaint function to do your custom drawing.

Everything else is just MFC, although you have to be careful about redrawing. If you're constantly redrawing, you could get a bit of flicker.

To show your control in a dialog, you have do the following:

1. Add a Custom Control to the dialog.
2. Set the "Class" property of the custom control to the name of your custom class.
3. Make sure you register your custom class using the AfxRegisterClass() function. An example of this is in ChordDisplay.cpp.

In making this control, I learned something very important. If you can draw something with the CDC drawing functions, then do it that way. Bitmaps are easy enough to blit onto the Device Context, but if you need transparency or any fancy stuff, you're gonna be spending a good bit of time figuring it out (or searching for code that does what you want). I used 100% CDC drawing functions for my guitar control.

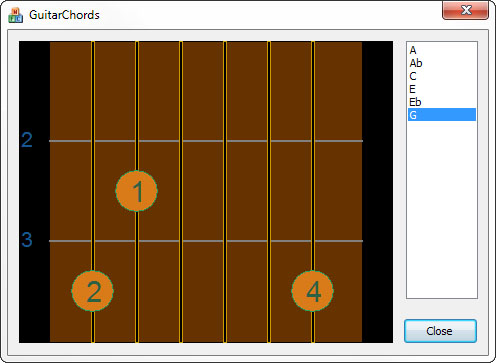
Here's a screenshot:


And, as always, my source code is here. The control can be told to draw a chord by filling a struct with some data. See ChordDatabase.cpp for more how to do that. An expansion of this would be to get a full database of chords that could be loaded from an xml file. I've only got a few chords here because it's just a sample to show the control.

Tuesday, April 8, 2008

Playing with OpenGL - Mouse Interaction

I haven't worked with OpenGL in a long time. The last time I wrote anything using OpenGL was in college when I took a class on it. Well, I recently bought the OpenGL SuperBible, and from reading the first bit of it, it sounds like some interesting stuff has developed. There's now this OpenGL shading language? I don't remember anything about that, at least. There's also a trimmed down version of OpenGL for mobile devices too, and that's really cool.

Anyways, I remember in the class I never ended up with an OpenGL app that would allow for proper mouse rotation of a 3d object. Mouse interaction was never really assigned in that class, and I remember spending a lot of my time trying to figure out the math the teacher was having us do instead.

So I thought now that I'm jumping back into OpenGL related stuff, my first project should be revisiting that very simple, yet often overlooked bit of code that handles mouse interaction. I reviewed some of the code I had written in the class, and it had the basic idea right, but not enough thought put into it.

So I started fresh. I've learned some interesting things:

ROTATION
If you rotate the camera about your scene, then you won't be able to spin a translated object in place (what you get is a big swing around the object, rather than watching the object spin). So it seems one wants to rotate the the whole scene before drawing it. This is, of course, to mimic what is seen in 3ds Max.

TRANSLATION
This is probably the easiest part of the math involved. Since translation from this projects point of view is moving about the screen plane, then we only have to move in two dimensions (The third dimension is zoom). All that needs be done is move our eyeball AND the point we're looking at in parallel.

ZOOM
This one is a bit tricky. The effect we want is to move our eye closer to the point we're looking at. This point is not necessarily the object. Imagine you have an eye location E and a focus point F. Moving our eye towards F involves a little bit of vector math. If we create a vector from E to F, we are half way there. To do that, subtract F from E in each dimension:

Vx = Fx - Ex;
Vy = Fy - Ey;
Vz = Fz - Ez;

Now we simple move our Eye point along this vector. Multiple the vector by some scaling factor and add

newEye = E + V*scale;

or

newEyex = Ex + Vx*scale;
newEyey = Ey + Vy*scale;
newEyez = Ez + Vz*scale;

When you think about the math, it makes sense. When you look at the math, it's easy to get confused.

At any rate, here's my program. I've tried to put it together so you don't need to modify your paths to get it to build (the glut library is included).

Thursday, April 3, 2008

My First 3ds Max

Well, I've been focusing most of my book reading energy on my Essential Mathematics for Games and Interactive Applications book, but this week I decided to take a bit of time to play with 3ds Max a bit. I went through the Quick Start at the beginning of the 3ds Max 2008 Bible and here's what I've learned so far:

1. 3ds max is a power tool for graphics.
2. There is a TON of functionality in 3ds Max.
3. The 3ds Max developers have made a custom UI so they can fit all the functionality in. For example, scroll bars are about 4 pixels wide.
4. Even with all the functionality, 3ds Max is actually pretty easy to use (so far).

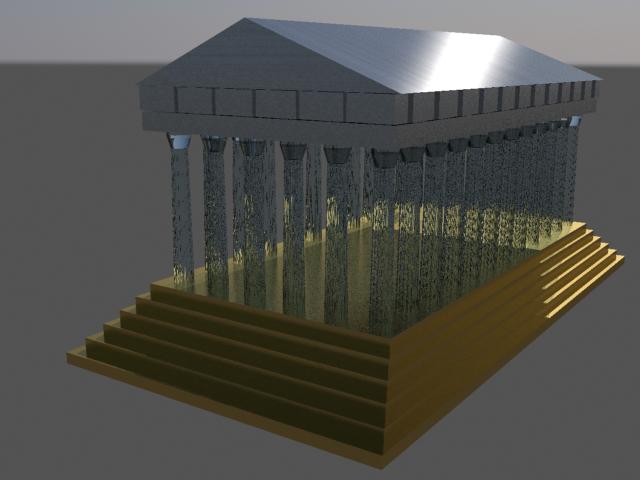
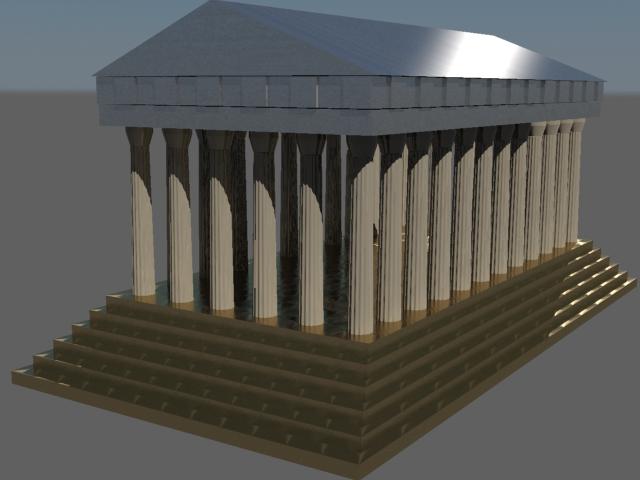
The Quick start has you create a Greek structure with some columns and stairs. You then animate a camera along a line, and render a video. My camera skills need a lot of work, so I won't post the video I created. But here are a couple renderings of the structure itself to give you an idea.

One with Glass columns (what the book recommends):


And one with some more normal looking columns:


and holy cow. I just closed 3ds Max, and instead of saying "Yes, I'd like to save", I clicked the no button on accident :(. Oh well, if I need to make that temple again later, I'll probably know way more and be able to make it even better.

Monday, March 3, 2008

XNA - How to Disable Bitmap Magnification Blending (Blur)

In working on my code for Conway's Game of Life, I ran into a problem with the default bitmap scaling behavior in XNA. I'm generating a bitmap that I scale to the size of the window. When this bitmap is displayed, it is shown as a blurry mess:


Removing that doggone blending is actually quite simple. You have to modify your spriteBatch.begin() call, and modify the graphics device settings immediately after, like so:

spriteBatch.Begin(SpriteBlendMode.AlphaBlend,

SpriteSortMode.Immediate, SaveStateMode.None);

graphics.GraphicsDevice.SamplerStates[0].MagFilter = TextureFilter.None;


The key in the spriteBatch.Begin() call is the SpriteSortMode. Setting this value to immediate causes any changes to the graphics device to be applied immediately. And we want to make a change, as you can see in the next line of code. I'm changing the magnification filter to TextureFilter.None because I don't want it to blue anything. After this, you draw and scale your sprites like normal. The result looks like this:


ahh... much better!

Sunday, March 2, 2008

Displaying a Mouse Pointer in XNA

XNA doesn't automatically show you a mouse pointer within the game window. Solving this is easy. First, you need a position for your mouse. You'll also need a 2d texture to display as your mouse pointer. Declare this within your game class:


Texture2D m_mouseTexture;

Vector2 m_mousePos;


Be sure to initialize it to zero. For simplicity, I also generate a simple red square texture to use as the mouse pointer. I'm doing all of this in the Initialize() function. In my (very short) experience with XNA, you'd want to initialize textures in the LoadContent() function, but this is not loading from a file, so it's safe to do it all in the Initialize() function like this:


m_mousePos = Vector2.Zero;


m_mouseTexture = new Texture2D(graphics.GraphicsDevice, (int)POINTSIZE, (int)POINTSIZE, 1, TextureUsage.None, SurfaceFormat.Color);


Color[] texture = new Color[POINTSIZE * POINTSIZE];

for (int i = 0; i < texture.Length; ++i)

{

    texture[i] = Color.Red;

}

m_mouseTexture.SetData(texture);


Now, in the Update() function, update your mouse position:


MouseState mouseState = Mouse.GetState();

m_mousePos.X = mouseState.X;

m_mousePos.Y = mouseState.Y;


And finally, in the Draw() function, draw your sprite in a spritebatch:


spriteBatch.Begin();

spriteBatch.Draw(m_mouseTexture, m_mousePos, null, Color.White, 0f,

        Vector2.Zero, 1.0f, SpriteEffects.None, 0f);

spriteBatch.End();


Grab the sample project for this here.

Saturday, March 1, 2008

Conway's Game of Life


I thought I should talk a little about the project I'm focusing on right now. I'm still spinning up on XNA, and I was reading an article somewhere recently that mentioned Conway's Game of Life. I was never taught about this in school for some reason. What a wonderful little thing!

Anyways, I thought it would be fun to implement Conway's Game of Life in XNA to give myself something tangible (in the software sense... what does that really mean, anyways?) to work on. I've already got a basic architecture done, but I want to write down some of the guidelines I'm trying to stick to. Just basic stuff, like:

What am I trying to learn?
- I want to learn about what it will take to implement a menu system in XNA.
- I want to learn about mouse interaction with an object (the game board) on the screen.

Which Game of Life algorithm should I use?
- a few are mentioned on the wiki page, notably hashlife. Since I'm not trying to learn about Game of Life specifics, I'm going to start with brute force with two 2d arrays (one for the current interation, and one for the next). It will give me a good quick start on my goal, and also give me a good baseline if I decide to optimize the algorithm.

What operations should I allow?
- a mouse click should turn a cell on or off. Hold and drag to fill or unfill cells under the mouse pointer
- spacebar should step to the next iteration.
- enter should run through iterations at the chosen speed (we'll need a menu for that).

What should the menu contain?
- Options
- run speed
- window size
- colors?
- I'll leave any other nifty stuff for later.

Things that would be very interesting to implement:
- the ability to move and zoom the camera around the grid with the mouse or keyboard
- some logic to move and zoom the camera automatically, and follow the most activity in the grid. One nasty corner case for this is any gliders that come off of the high activity areas. how do i know when to ignore them?

More to come later when I have more of this implemented.

Friday, February 29, 2008

OpenGL SuperBible: Chapter 1

I read through the introduction and chapter 1 of the OpenGL SuperBible. It was 100% review, but it's well written, so I just went with it. I remember enjoying reading my OpenGL book in college, and I really enjoy the author of this book as well. There's something about graphics programmers, I guess. They're not 100% engineer. They know how to put graphics together, and I guess that bleeds over into other less technical tasks, like arranging words on a page. Come to think of it, my OpenGL teacher was pretty entertaining, too. He looked like the neighbor dad from Honey, I Shrunk the Kids, and that amused me.