Friday, May 16, 2008
On Other Projects
I haven't made a post in the last two weeks because I've been working on another top secret project. I'm guessing it will take another two weeks of my time, and then I'll start posting some more stuff here. 'Til then...
Thursday, May 1, 2008
A Custom MFC Control to Display Guitar Chords
Recently, I've tasked myself with learning a bit more about custom MFC controls. For a hands on project, I chose to create a custom MFC control for displaying guitar chords. The basic steps of creating custom MFC controls are this:
1. Create a class for your control, and inherit from a control similar to what you want to make. If nothing is similar, inherit from CStatic.
2. Override the OnPaint function to do your custom drawing.
Everything else is just MFC, although you have to be careful about redrawing. If you're constantly redrawing, you could get a bit of flicker.
To show your control in a dialog, you have do the following:
1. Add a Custom Control to the dialog.
2. Set the "Class" property of the custom control to the name of your custom class.
3. Make sure you register your custom class using the AfxRegisterClass() function. An example of this is in ChordDisplay.cpp.
In making this control, I learned something very important. If you can draw something with the CDC drawing functions, then do it that way. Bitmaps are easy enough to blit onto the Device Context, but if you need transparency or any fancy stuff, you're gonna be spending a good bit of time figuring it out (or searching for code that does what you want). I used 100% CDC drawing functions for my guitar control.
Here's a screenshot:
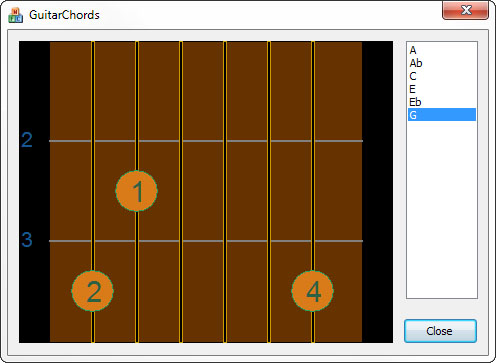
And, as always, my source code is here. The control can be told to draw a chord by filling a struct with some data. See ChordDatabase.cpp for more how to do that. An expansion of this would be to get a full database of chords that could be loaded from an xml file. I've only got a few chords here because it's just a sample to show the control.
1. Create a class for your control, and inherit from a control similar to what you want to make. If nothing is similar, inherit from CStatic.
2. Override the OnPaint function to do your custom drawing.
Everything else is just MFC, although you have to be careful about redrawing. If you're constantly redrawing, you could get a bit of flicker.
To show your control in a dialog, you have do the following:
1. Add a Custom Control to the dialog.
2. Set the "Class" property of the custom control to the name of your custom class.
3. Make sure you register your custom class using the AfxRegisterClass() function. An example of this is in ChordDisplay.cpp.
In making this control, I learned something very important. If you can draw something with the CDC drawing functions, then do it that way. Bitmaps are easy enough to blit onto the Device Context, but if you need transparency or any fancy stuff, you're gonna be spending a good bit of time figuring it out (or searching for code that does what you want). I used 100% CDC drawing functions for my guitar control.
Here's a screenshot:
And, as always, my source code is here. The control can be told to draw a chord by filling a struct with some data. See ChordDatabase.cpp for more how to do that. An expansion of this would be to get a full database of chords that could be loaded from an xml file. I've only got a few chords here because it's just a sample to show the control.
Saturday, April 26, 2008
Farseer Physics
I've been playing with the Farseer Physics engine lately. It's a physics engine for XNA and Silverlight. I've been toying with the idea of a game involving spiderman-like web swinging. You have a character, and he can fire a grappling hook from either hand. He the uses this mechanism to swing about. What I've got so far is a box that can fire a single grappling hook and swing about the screen. It's taken me 3 hours or so to get this far (which i think is pretty quick), and I attribute the quick spin-up to how easy the Farseer engine is to use.
The only gripe i have is that it has basically zero documentation. And since this code has been around since 2006, I'm gonna guess no documentation is coming any time soon. The good news is they provide quite a bit of sample code, and the guy who wrote it seems to reply to just about every question people can think of on the codeplex boards.
Either way, i'm having some fun. I'll post some code when I get there.
Tuesday, April 8, 2008
Playing with OpenGL - Mouse Interaction
I haven't worked with OpenGL in a long time. The last time I wrote anything using OpenGL was in college when I took a class on it. Well, I recently bought the OpenGL SuperBible, and from reading the first bit of it, it sounds like some interesting stuff has developed. There's now this OpenGL shading language? I don't remember anything about that, at least. There's also a trimmed down version of OpenGL for mobile devices too, and that's really cool.
Anyways, I remember in the class I never ended up with an OpenGL app that would allow for proper mouse rotation of a 3d object. Mouse interaction was never really assigned in that class, and I remember spending a lot of my time trying to figure out the math the teacher was having us do instead.
So I thought now that I'm jumping back into OpenGL related stuff, my first project should be revisiting that very simple, yet often overlooked bit of code that handles mouse interaction. I reviewed some of the code I had written in the class, and it had the basic idea right, but not enough thought put into it.
So I started fresh. I've learned some interesting things:
ROTATION
If you rotate the camera about your scene, then you won't be able to spin a translated object in place (what you get is a big swing around the object, rather than watching the object spin). So it seems one wants to rotate the the whole scene before drawing it. This is, of course, to mimic what is seen in 3ds Max.
TRANSLATION
This is probably the easiest part of the math involved. Since translation from this projects point of view is moving about the screen plane, then we only have to move in two dimensions (The third dimension is zoom). All that needs be done is move our eyeball AND the point we're looking at in parallel.
ZOOM
This one is a bit tricky. The effect we want is to move our eye closer to the point we're looking at. This point is not necessarily the object. Imagine you have an eye location E and a focus point F. Moving our eye towards F involves a little bit of vector math. If we create a vector from E to F, we are half way there. To do that, subtract F from E in each dimension:
Vx = Fx - Ex;
Vy = Fy - Ey;
Vz = Fz - Ez;
Now we simple move our Eye point along this vector. Multiple the vector by some scaling factor and add
newEye = E + V*scale;
or
newEyex = Ex + Vx*scale;
newEyey = Ey + Vy*scale;
newEyez = Ez + Vz*scale;
When you think about the math, it makes sense. When you look at the math, it's easy to get confused.
At any rate, here's my program. I've tried to put it together so you don't need to modify your paths to get it to build (the glut library is included).
Saturday, April 5, 2008
Finished with Conway's game of life
Well, I've gotten what I want out of my attempt at writing Conway's Game of Life. I was mostly using Conway's as a reason to put together a menu system, and it has gotten me that. I posted my menu code here. So, with that in mind, here's my code for Conway's Game of Life. I built it using XNA GSE 2.0 in Visual Studio 2005. It's a very humble implementation, and rather than making this more interesting, I'd like to spend some time with other more interesting projects. More to come on that as soon as I have something worth showing.
Thursday, April 3, 2008
My First 3ds Max
Well, I've been focusing most of my book reading energy on my Essential Mathematics for Games and Interactive Applications book, but this week I decided to take a bit of time to play with 3ds Max a bit. I went through the Quick Start at the beginning of the 3ds Max 2008 Bible and here's what I've learned so far:
1. 3ds max is a power tool for graphics.
2. There is a TON of functionality in 3ds Max.
3. The 3ds Max developers have made a custom UI so they can fit all the functionality in. For example, scroll bars are about 4 pixels wide.
4. Even with all the functionality, 3ds Max is actually pretty easy to use (so far).
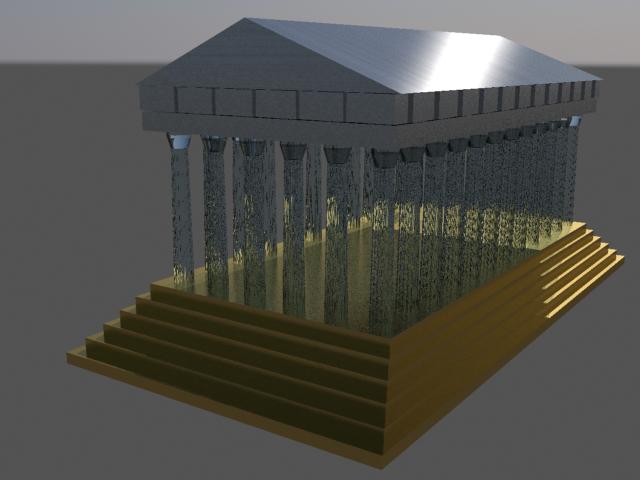
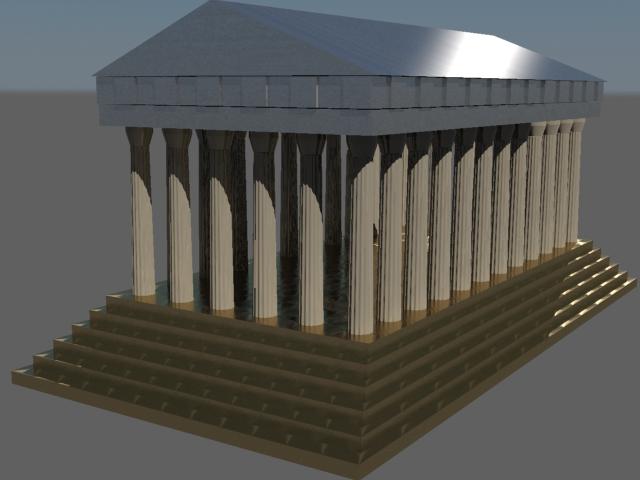
The Quick start has you create a Greek structure with some columns and stairs. You then animate a camera along a line, and render a video. My camera skills need a lot of work, so I won't post the video I created. But here are a couple renderings of the structure itself to give you an idea.
1. 3ds max is a power tool for graphics.
2. There is a TON of functionality in 3ds Max.
3. The 3ds Max developers have made a custom UI so they can fit all the functionality in. For example, scroll bars are about 4 pixels wide.
4. Even with all the functionality, 3ds Max is actually pretty easy to use (so far).
The Quick start has you create a Greek structure with some columns and stairs. You then animate a camera along a line, and render a video. My camera skills need a lot of work, so I won't post the video I created. But here are a couple renderings of the structure itself to give you an idea.
One with Glass columns (what the book recommends):
And one with some more normal looking columns:
and holy cow. I just closed 3ds Max, and instead of saying "Yes, I'd like to save", I clicked the no button on accident :(. Oh well, if I need to make that temple again later, I'll probably know way more and be able to make it even better.
Saturday, March 29, 2008
New Menu Code
Download source code for this project
Okay, It's been busy at home lately. I've been moving it. But I've been trying to find a little time every day to work on my XNA stuff, and I've got a much more complete menu system now.
I've made some changes:
- The menu now shows a default "Return" choice at the bottom of each list. This can be turned off by setting the "showBackChoice" boolean.
- The menu now has two types of choices, Normal and LeftRight. Normal choice will show their child choices as a separate menu when they are executed. LeftRight choices will show their child choices as a list to the left of the parent choice when they are SELECTED.
I've also made the sample code show a bit more info in the console as you are viewing the menu. The sample code initializes the menu as follows:
So there you go. Pretty simple. If I make any more changes, I'll be sure to post them. Possible changes could be:
- using a proper spriteFont to display the text (so we could use something besides Times new Roman).
- making background images actually work.
- something I overlooked....
I've realized as I've been working on this that is might have been easier to just implement it using a full on tree, rather than a bunch of sneaky lists.
Okay, It's been busy at home lately. I've been moving it. But I've been trying to find a little time every day to work on my XNA stuff, and I've got a much more complete menu system now.
I've made some changes:
- The menu now shows a default "Return" choice at the bottom of each list. This can be turned off by setting the "showBackChoice" boolean.
- The menu now has two types of choices, Normal and LeftRight. Normal choice will show their child choices as a separate menu when they are executed. LeftRight choices will show their child choices as a list to the left of the parent choice when they are SELECTED.
I've also made the sample code show a bit more info in the console as you are viewing the menu. The sample code initializes the menu as follows:
mainMenu.AddChoice("Choice 1");
MenuChoice choice = mainMenu.AddChoice("LR Choice");
choice.AddLeftRightChoices(new string[] { "one", "two", "three" });
choice = mainMenu.AddChoice("Sub Menu");
choice.AddChoice("Sub choice 1");
choice.AddChoice("Sub choice 2");
mainMenu.ChoiceExecuted += new Menu.ChoiceExecutedHandler(ChoiceExecuted);
mainMenu.ChoiceSelected += new Menu.ChoiceSelectedHandler(ChoiceSelected);
mainMenu.ChoiceDeselected += new Menu.ChoiceDeselectedHandler(ChoiceDeselected);
So there you go. Pretty simple. If I make any more changes, I'll be sure to post them. Possible changes could be:
- using a proper spriteFont to display the text (so we could use something besides Times new Roman).
- making background images actually work.
- something I overlooked....
I've realized as I've been working on this that is might have been easier to just implement it using a full on tree, rather than a bunch of sneaky lists.
Subscribe to:
Posts (Atom)