I've recently been working on getting QuickTime player to work in Internet Explorer (and Firefox and Safari), and as you might expect there are some catches to getting a rich QuickTime UI to work with IE. By rich QuickTime UI, I mean a UI you've built yourself that embeds a QuickTime window. Furthermore, to keep your UI updated to the state of the player, you're using DOM events. I thought I'd do a brain dump to refresh my own memory and potentially help some others. So here we go:
Question 1: Why don't my DOM events work in Internet Explorer?
Answer: They work, but they don't work properly, that's for sure. The Apple documentation provides an example the just doesn't work. QuickTime DOM events won't get sent unless you add a [relatively simple] hack, the essence of which requires you to reload the clip you're playing. Pseudocode looks like this (in javascript):
load clip in QuickTime
wait until plugin status is loaded (or complete )
// begin hack
quicktimeMovie.SetResetPropertiesOnReload(false);
quicktimeMovie.setURL(movieURL);
registerDOMEvents(quicktimeMovie);
// end hack
So essentially, you have to generate your object/embed code, load the quicktime player once (by setting innerHTML somewhere), and then do a setURL with the same clip before registering for DOM Events. If you don't do the setURL, you won't get DOM events.
Note that for other browsers you don't have to do this. So I suggest you wrap this code up in an if(IE) block.
Question 2: With the hack above (in IE), why does my app hang when loading long (15 minutes plus) clips?
Answer: Your app is hanging because the QuickTime plugin didn't get time to stabilize before you called setURL. I didn't find a way around this, but a solid solution is to use a dummy clip (1 or 2 seconds of black) that you load up before loading your real clip. Once you've got DOM events registered, you can use setURL to switch to other clips. Pseudocode looks something like this:
function initQuickTime()
{
[code from answer 1 loading a dummy clip]
}
function loadClip(clip)
{
if(firstLoad)
{
initQuickTime();
}
quicktimeMovie.setURL(clip);
}
And you're good to go. setURL can be used from here on in if you need to switch clips.
Other Notes:
1. You can't resize the QuickTime window without reloading the clip. I really want to be wrong about this, but if you need to change the size of the video window, you have to redo your object/embed code. Kind of a pain, but resizing has to be done almost never, so it's workable.
2. If you're writing debug code, make sure all your test clips are on your http server. I made this mistake and wasted a couple hours. If, for example, you're working my pseudocode in question 2 and your dummy clip is on your PC, but your app accesses clips on an http server somewhere, it just won't work. QuickTime player has some initialization in it that defaults to either local files or http files (I don't really know the details).
That's about it. Overall I really like QuickTime player. Compared to the directshow work I've done, it's a lot easier to use. There are a lot less corner cases you have to deal with (if you're trying to get frame accuracy, for example). The compatibility issues in diffferent browsers come with the turf, and they're realtively easy to deal with elegantly if you know what you're up against.
Monday, December 8, 2008
Monday, October 20, 2008
Adobe XFDF
Adobe Xml Forms Data Format is an xml format that allows you to fill PDF forms. I used this in my D&D character generator to allow for easy creation of a printable character sheet in PDF form.
I started with an editable PDF form. Each field in an editable form has a name of some sort, and if you have access to Adobe LiveCycle Designer, you can view the fields as XML. All you have to do is open the editable PDF in LiveCycle Designer and click View->XML Source. This will give you a long XML list detailing all the fields in your form.
UPDATE 2008-11-13: I got an email from someone recently who was creating his editable form using LiveCycle Designer. It turns out that if you use LiveCycle Designer to build your form, it won't work with XFDF. If you want to use XFDF, you have to create the form using Acrobat. LiveCycle Designer forms require that you use XDP (which I have never used). You can read a bit more about the incompatibilities here.
To specify the values to go into an editable PDF, you create an XFDF file. The basic format is this:
<?xml version="1.0" encoding="UTF-8"?>
<xfdf xmlns="http://ns.adobe.com/xfdf/" xml:space="preserve">
<f href="http://www.lukerymarz.com/files/CharacterSheet.pdf"/>
<fields>
<field name="name">
<value>null</value>
</field>
<field name="level">
<value>1</value>
</field>
<field name="class">
<value>Warlock</value>
</field>
<field name="race">
<value>Tiefling</value>
</field>
...
...
...
</fields>
</xfdf>
You put this in a text file with an xfdf extension and when you open it, it will reference the pdf in the <f> field and fill in the specified fields.
So how do you get from the XML LiveCycle Designer gives you to the actual xfdf data. Well, I didn't want to type a bunch of repetitive lines for each field in the form, so I wrote a little tool to take the LiveCycle xml and spit out ActionScript. My tool opens the LiveCycle XML, parses each field, and provides a listing with the field type. It then converts each field to ActionScript code that will append to a string in a my output function. All I did then was copy the ActionScript code, fill in the specific piece of data for each field (for example, currentCharacter.name for the "name" field), and the output was done.
There are two caveats I ran into, and the first has to do with spaces. For each field, the name of that field in the LiveCycle XML has an underscore where a space is. In the XFDF XML you generate, those underscores need to be replaced with an actual space, otherwise your field won't get filled in.
The second caveat has to do with arrays. For example, a part of the ActionScript code my tool generated looks like this:
xfdf += '<field name="class_feature.0"><value>' + Database.Data.currentCharacter. + '</value></field>';
xfdf += '<field name="class_feature.1"><value>' + Database.Data.currentCharacter. + '</value></field>';
xfdf += '<field name="class_feature.2"><value>' + Database.Data.currentCharacter. + '</value></field>';
xfdf += '<field name="class_feature.3"><value>' + Database.Data.currentCharacter. + '</value></field>';
xfdf += '<field name="class_feature.4"><value>' + Database.Data.currentCharacter. + '</value></field>';
xfdf += '<field name="class_feature.5"><value>' + Database.Data.currentCharacter. + '</value></field>';
xfdf += '<field name="class_feature.6"><value>' + Database.Data.currentCharacter. + '</value></field>';
This is an array of class features. You'd think you could just go through the list, creating:
<field name="class feature.0">
<value>sample feature 1</value>
</field>
<field name="class feature.1">
<value>sample feature 2</value>
</field>
But that is incorrect. Since this is an array, you have to represent it as one in the xfdf. The actual output would look like this:
<field name="class feature">
<field name="0">
<value>Eldritch Blast:</value>
</field>
<field name="1">
<value>Edlritch Pact: Choose Fey Pact, Infernal Pact, or Star Pact.</value>
</field>
<field name="2">
<value>Prime Shot: If you are closest to your target, +1 to attack rolls</value>
</field>
</field>
And that's it. If you reference a pdf on a website, you can send only the xfdf to your user, and as long as they have access to your website, when they open the xfdf, Adobe will take care of the rest. Pretty neat, once you get past the catches.
Saturday, October 4, 2008
XML schemas, Excel, and getting what you want
In my character generator, there is a lot of data. There's races, classes, skill, feats, and powers. On top of that, they're not static lists. Wizards of the Coast (and other people) are always adding and expanding on everything. With that in mind, I knew I needed to have all that data extensible in my character generator. XML is the obvious choice, especially since Flex is so good at parsing it.
But how was I to get the data in the PHB into XML in the easiest way possible? Microsoft Excel and XML Schemas is the answer. The basic idea is that you enter all your data into Microsoft Excel as a big list. Then you tell Excel to export it as XML. That XML is then fed into the Flex app.
XML schemas tell Excel how to format the XML you export. With an XML schema, you're defining the basic format of your XML (in XML, ironically). There's an article here that gives a good way to create a simple Xml Schema Definition (XSD) using Excel (see step 6, specifically). That will give you the schema, and then you can attach that to your Excel spreadsheet and have Excel export XML for you.
But there's a HUGE caveat. Excel cannot handle (that is, export, import, deal with at all) XML with a list of lists. This looks something like this:
<feats>
<feat name="a">
<prerequisites>
<prerequisite name="x"/>
<prerequisite name="y"/>
</prerequisites>
</feat>
<feat name="b">
<prerequisites>
<prerequisite name="p"/>
<prerequisite name="q"/>
</prerequisites>
</feat>
</feats>
We've got a list of feats, each containing a list of prerequisites. The issue, specifically, is that we have many elements. Now, if you think about this, it makes sense. Excel allows you to easily edit a two dimensional array of data. More than that and it gets complicated.
The solution I went with to get around this (because I require being able to add and remove from various lists of data, and it makes the XML easier to read) is to make use of the really good XML functionality in Flex. My solution works like this:
1. enter you data in Excel. any time you have a list of things, enter them as a single cell and separate each "thing" with a comma.
2. export to a simple xml format.
3. feed the xml into a Flex app that takes the XML and converts any comma separated lists to a proper XML list.
A sample of this is here. My flex app takes a list of feats I exported from Excel (shown on the left side), and then prints the proper XML for me to save to a file (shown on the right side). There's now an extra step if I update my Excel spreadsheet, but it's better than having to edit XML all day long.
Unfortunately, I don't know of a way to get Flex to do magic things with XML schemas, so the dream app of being able to give one XML format and export another is still off my radar. Also, you are effectively writing your XML schema in Flex code, so if you need to make a schema change, it's instead a Flex code change. This is not necessarily bad. I feel more comfortable making changes in code instead of in fancy XML schema editors.
Now, I've heard that Altova makes a really nice application that can handle lists of lists, but I haven't tried it (and the price is outside my budget). Something for next time, I suppose. For now, I've got a "good enough" solution for tricky XML, and it will be easy to update in the future if I need to.
Saturday, September 20, 2008
Character Generator update
I've updated the Character Builder. I added a changelog that tracks the changes I've made. It's accessible from the About box (click the top right button in the app).
I made a fix for the healing surges not showing up, and I fixed a bug that was keeping humans from getting their bonus skill, feat, and power.
I made a fix for the healing surges not showing up, and I fixed a bug that was keeping humans from getting their bonus skill, feat, and power.
Friday, September 19, 2008
bugs in Generator
There seems to be a bug in the healing surges calculations on the character sheet. I'll take a look sometime this weekend. I'll also look at the character sheet and see if I can get, for example, the damage and attack workspaces to show blank instead of Zero so they can be filled in with a pencil.
Wednesday, September 17, 2008
D&D Character Generator
UPDATE 2009.08.14 - I've posted a new build with PHB 2 races and classes, and a handful of new features. See the details here.
UPDATE 2009.04.01 - You will need Flash 10 to run this now. I've updated the "view as PDF" functionality so it uses the new Flash 10 feature to create files on the fly. It doesn't have to ask my server to create the file anymore. Hooray! I've also changed the size a bit. See the change log in the about box for more info.
Ok. I've FINALLY finished a project I've been working on for the last couple months. I've been giving it about two 4 hour sessions a week, and [AT LAST!] I'm satisfied enough with it to post it.
It's a character generator for Dungeons and Dragons 4th edition. I got the books in July when they released the set, and I thought it would be fun to put together a character generator that made it a bit easier to parse the whole thing.
This bad boy is written in Flex, so you can run it from any web browser with Flash 9. The general idea is that you build your character through the flex interface, and when you're done, click the "View as PDF" button and out pops a nice PDF for you to print out. It DOES NOT replace the Player's Handbook in any way. It's more of an easing function on the whole ordeal.
Use the app here. You'll need Flash 9. Don't forget that you can drag and drop your stat numbers in the Standard Array and Roll entry types. I haven't yet figured out a good way to indicate that they're draggable, as the Flex "useHandCursor" flag doesn't see to work.
Here's a list of caveats / known flaws / things that aren't implemented:
- THIS DOES NOT REPLACE THE PLAYERS HANDBOOK.
- choosing of equipment is not implemented. You'll need to use the PHB after you print your PDF.
- Half-Elf: after creating the PDF, be sure to choose an at-will power from another class for the dilettante race feature.
- Ranger: After creating the PDF, choose Dungeoneering or Nature as a skill. This will affect your modifier for the skill by 5 points, so don't forget!
- There appears to be an error in the class listings in the Player's Handbook. When a skill is automatically given (listed as "free" in my UI), it is also listed as a choice. In my code, I automatically remove the free skills from the choice list.
- I have not implemented languages. choose them on the PDF.
- Human: you get +2 to an ability of your choice. Do this on the PDF.
- The PDF has some fields that automatically fill as Zero. If there are certain ones you think should not be filled at all, let me know and I'll fix them.
- certain class and race features require you to choose between two things. In cases where this is not implemented, it is listed on the character sheet as a "choose x or y" listing under the class/race features sections.
UI bugs:
- there's a minor glitch in the positioning of the strength stat when you drag a number on top of it (only seen in the Roll entry type).
- Powers have no descriptions. They're intended to not have power descriptions, but they're supposed to say "See Player's Handbook".
Note that I got the character sheet pdf I'm currently using from here.
This was a very fun little project. I enjoy writing apps in Flex. In working on this, I learned about XML schemas, XFDF (a pdf format), and some Perl tricks I'm currently using on my server. I'll make some posts soon about all that stuff. I wrote some helper Flex apps that I'll post as well.
Friday, May 16, 2008
On Other Projects
I haven't made a post in the last two weeks because I've been working on another top secret project. I'm guessing it will take another two weeks of my time, and then I'll start posting some more stuff here. 'Til then...
Thursday, May 1, 2008
A Custom MFC Control to Display Guitar Chords
Recently, I've tasked myself with learning a bit more about custom MFC controls. For a hands on project, I chose to create a custom MFC control for displaying guitar chords. The basic steps of creating custom MFC controls are this:
1. Create a class for your control, and inherit from a control similar to what you want to make. If nothing is similar, inherit from CStatic.
2. Override the OnPaint function to do your custom drawing.
Everything else is just MFC, although you have to be careful about redrawing. If you're constantly redrawing, you could get a bit of flicker.
To show your control in a dialog, you have do the following:
1. Add a Custom Control to the dialog.
2. Set the "Class" property of the custom control to the name of your custom class.
3. Make sure you register your custom class using the AfxRegisterClass() function. An example of this is in ChordDisplay.cpp.
In making this control, I learned something very important. If you can draw something with the CDC drawing functions, then do it that way. Bitmaps are easy enough to blit onto the Device Context, but if you need transparency or any fancy stuff, you're gonna be spending a good bit of time figuring it out (or searching for code that does what you want). I used 100% CDC drawing functions for my guitar control.
Here's a screenshot:
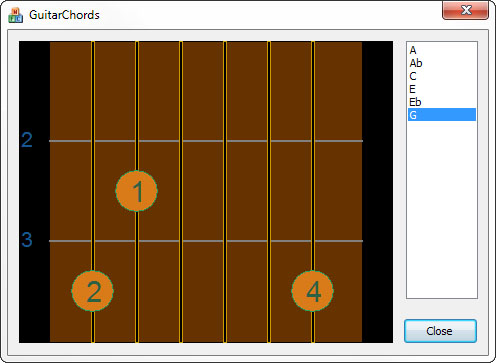
And, as always, my source code is here. The control can be told to draw a chord by filling a struct with some data. See ChordDatabase.cpp for more how to do that. An expansion of this would be to get a full database of chords that could be loaded from an xml file. I've only got a few chords here because it's just a sample to show the control.
1. Create a class for your control, and inherit from a control similar to what you want to make. If nothing is similar, inherit from CStatic.
2. Override the OnPaint function to do your custom drawing.
Everything else is just MFC, although you have to be careful about redrawing. If you're constantly redrawing, you could get a bit of flicker.
To show your control in a dialog, you have do the following:
1. Add a Custom Control to the dialog.
2. Set the "Class" property of the custom control to the name of your custom class.
3. Make sure you register your custom class using the AfxRegisterClass() function. An example of this is in ChordDisplay.cpp.
In making this control, I learned something very important. If you can draw something with the CDC drawing functions, then do it that way. Bitmaps are easy enough to blit onto the Device Context, but if you need transparency or any fancy stuff, you're gonna be spending a good bit of time figuring it out (or searching for code that does what you want). I used 100% CDC drawing functions for my guitar control.
Here's a screenshot:
And, as always, my source code is here. The control can be told to draw a chord by filling a struct with some data. See ChordDatabase.cpp for more how to do that. An expansion of this would be to get a full database of chords that could be loaded from an xml file. I've only got a few chords here because it's just a sample to show the control.
Saturday, April 26, 2008
Farseer Physics
I've been playing with the Farseer Physics engine lately. It's a physics engine for XNA and Silverlight. I've been toying with the idea of a game involving spiderman-like web swinging. You have a character, and he can fire a grappling hook from either hand. He the uses this mechanism to swing about. What I've got so far is a box that can fire a single grappling hook and swing about the screen. It's taken me 3 hours or so to get this far (which i think is pretty quick), and I attribute the quick spin-up to how easy the Farseer engine is to use.
The only gripe i have is that it has basically zero documentation. And since this code has been around since 2006, I'm gonna guess no documentation is coming any time soon. The good news is they provide quite a bit of sample code, and the guy who wrote it seems to reply to just about every question people can think of on the codeplex boards.
Either way, i'm having some fun. I'll post some code when I get there.
Tuesday, April 8, 2008
Playing with OpenGL - Mouse Interaction
I haven't worked with OpenGL in a long time. The last time I wrote anything using OpenGL was in college when I took a class on it. Well, I recently bought the OpenGL SuperBible, and from reading the first bit of it, it sounds like some interesting stuff has developed. There's now this OpenGL shading language? I don't remember anything about that, at least. There's also a trimmed down version of OpenGL for mobile devices too, and that's really cool.
Anyways, I remember in the class I never ended up with an OpenGL app that would allow for proper mouse rotation of a 3d object. Mouse interaction was never really assigned in that class, and I remember spending a lot of my time trying to figure out the math the teacher was having us do instead.
So I thought now that I'm jumping back into OpenGL related stuff, my first project should be revisiting that very simple, yet often overlooked bit of code that handles mouse interaction. I reviewed some of the code I had written in the class, and it had the basic idea right, but not enough thought put into it.
So I started fresh. I've learned some interesting things:
ROTATION
If you rotate the camera about your scene, then you won't be able to spin a translated object in place (what you get is a big swing around the object, rather than watching the object spin). So it seems one wants to rotate the the whole scene before drawing it. This is, of course, to mimic what is seen in 3ds Max.
TRANSLATION
This is probably the easiest part of the math involved. Since translation from this projects point of view is moving about the screen plane, then we only have to move in two dimensions (The third dimension is zoom). All that needs be done is move our eyeball AND the point we're looking at in parallel.
ZOOM
This one is a bit tricky. The effect we want is to move our eye closer to the point we're looking at. This point is not necessarily the object. Imagine you have an eye location E and a focus point F. Moving our eye towards F involves a little bit of vector math. If we create a vector from E to F, we are half way there. To do that, subtract F from E in each dimension:
Vx = Fx - Ex;
Vy = Fy - Ey;
Vz = Fz - Ez;
Now we simple move our Eye point along this vector. Multiple the vector by some scaling factor and add
newEye = E + V*scale;
or
newEyex = Ex + Vx*scale;
newEyey = Ey + Vy*scale;
newEyez = Ez + Vz*scale;
When you think about the math, it makes sense. When you look at the math, it's easy to get confused.
At any rate, here's my program. I've tried to put it together so you don't need to modify your paths to get it to build (the glut library is included).
Saturday, April 5, 2008
Finished with Conway's game of life
Well, I've gotten what I want out of my attempt at writing Conway's Game of Life. I was mostly using Conway's as a reason to put together a menu system, and it has gotten me that. I posted my menu code here. So, with that in mind, here's my code for Conway's Game of Life. I built it using XNA GSE 2.0 in Visual Studio 2005. It's a very humble implementation, and rather than making this more interesting, I'd like to spend some time with other more interesting projects. More to come on that as soon as I have something worth showing.
Thursday, April 3, 2008
My First 3ds Max
Well, I've been focusing most of my book reading energy on my Essential Mathematics for Games and Interactive Applications book, but this week I decided to take a bit of time to play with 3ds Max a bit. I went through the Quick Start at the beginning of the 3ds Max 2008 Bible and here's what I've learned so far:
1. 3ds max is a power tool for graphics.
2. There is a TON of functionality in 3ds Max.
3. The 3ds Max developers have made a custom UI so they can fit all the functionality in. For example, scroll bars are about 4 pixels wide.
4. Even with all the functionality, 3ds Max is actually pretty easy to use (so far).
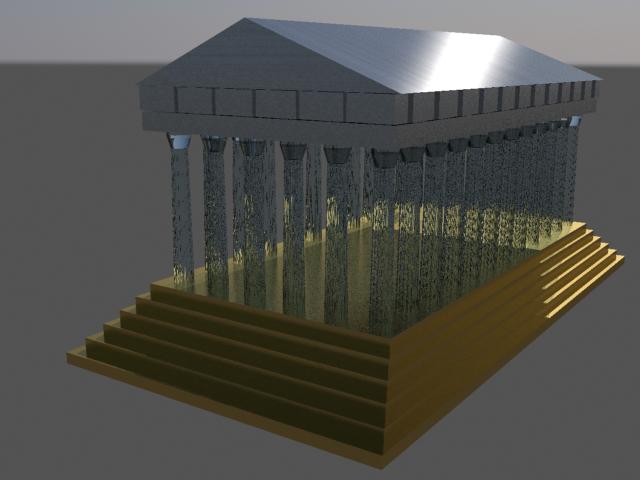
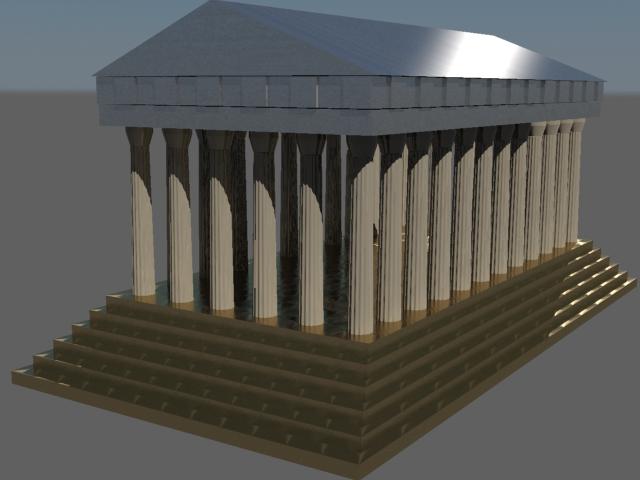
The Quick start has you create a Greek structure with some columns and stairs. You then animate a camera along a line, and render a video. My camera skills need a lot of work, so I won't post the video I created. But here are a couple renderings of the structure itself to give you an idea.
1. 3ds max is a power tool for graphics.
2. There is a TON of functionality in 3ds Max.
3. The 3ds Max developers have made a custom UI so they can fit all the functionality in. For example, scroll bars are about 4 pixels wide.
4. Even with all the functionality, 3ds Max is actually pretty easy to use (so far).
The Quick start has you create a Greek structure with some columns and stairs. You then animate a camera along a line, and render a video. My camera skills need a lot of work, so I won't post the video I created. But here are a couple renderings of the structure itself to give you an idea.
One with Glass columns (what the book recommends):
And one with some more normal looking columns:
and holy cow. I just closed 3ds Max, and instead of saying "Yes, I'd like to save", I clicked the no button on accident :(. Oh well, if I need to make that temple again later, I'll probably know way more and be able to make it even better.
Saturday, March 29, 2008
New Menu Code
Download source code for this project
Okay, It's been busy at home lately. I've been moving it. But I've been trying to find a little time every day to work on my XNA stuff, and I've got a much more complete menu system now.
I've made some changes:
- The menu now shows a default "Return" choice at the bottom of each list. This can be turned off by setting the "showBackChoice" boolean.
- The menu now has two types of choices, Normal and LeftRight. Normal choice will show their child choices as a separate menu when they are executed. LeftRight choices will show their child choices as a list to the left of the parent choice when they are SELECTED.
I've also made the sample code show a bit more info in the console as you are viewing the menu. The sample code initializes the menu as follows:
So there you go. Pretty simple. If I make any more changes, I'll be sure to post them. Possible changes could be:
- using a proper spriteFont to display the text (so we could use something besides Times new Roman).
- making background images actually work.
- something I overlooked....
I've realized as I've been working on this that is might have been easier to just implement it using a full on tree, rather than a bunch of sneaky lists.
Okay, It's been busy at home lately. I've been moving it. But I've been trying to find a little time every day to work on my XNA stuff, and I've got a much more complete menu system now.
I've made some changes:
- The menu now shows a default "Return" choice at the bottom of each list. This can be turned off by setting the "showBackChoice" boolean.
- The menu now has two types of choices, Normal and LeftRight. Normal choice will show their child choices as a separate menu when they are executed. LeftRight choices will show their child choices as a list to the left of the parent choice when they are SELECTED.
I've also made the sample code show a bit more info in the console as you are viewing the menu. The sample code initializes the menu as follows:
mainMenu.AddChoice("Choice 1");
MenuChoice choice = mainMenu.AddChoice("LR Choice");
choice.AddLeftRightChoices(new string[] { "one", "two", "three" });
choice = mainMenu.AddChoice("Sub Menu");
choice.AddChoice("Sub choice 1");
choice.AddChoice("Sub choice 2");
mainMenu.ChoiceExecuted += new Menu.ChoiceExecutedHandler(ChoiceExecuted);
mainMenu.ChoiceSelected += new Menu.ChoiceSelectedHandler(ChoiceSelected);
mainMenu.ChoiceDeselected += new Menu.ChoiceDeselectedHandler(ChoiceDeselected);
So there you go. Pretty simple. If I make any more changes, I'll be sure to post them. Possible changes could be:
- using a proper spriteFont to display the text (so we could use something besides Times new Roman).
- making background images actually work.
- something I overlooked....
I've realized as I've been working on this that is might have been easier to just implement it using a full on tree, rather than a bunch of sneaky lists.
Sunday, March 16, 2008
Basic Menu
Well, it's been busy lately, but I've got a solid start on the menu, so I thought I'd post what I have as a forcing function to make me clean up my code. You can grab the source here. To use the menu system, you need to an instance of the GameMenu in you code. You can declare this in you game class (don't forget to put "using GameMenu;" at the top of your code"):
Then, in LoadContent(), initialize the menu, it's choices, and any handlers you want to catch.
And in the Draw() method, call the menu's draw function:
If the menu isn't visible, those functions will do nothing. To show the menu, you set the visible property to true. I do this in the Update method when the user pressed escape:
And finally, when a menu choice is executed, you handle it as follows:
Menu mainMenu;
Then, in LoadContent(), initialize the menu, it's choices, and any handlers you want to catch.
mainMenu = new GameMenu.Menu(this);
mainMenu.AddChoice("Show Sprite");
mainMenu.AddChoice("Return");
mainMenu.ChoiceExecuted += new Menu.ChoiceExecutedHandler(ChoiceExecuted);
Of course, ChoiceExecuted should be defined somewhere. I'll get to that at the end. In your Update() method, call the game menu's update function:
mainMenu.Update(gameTime);
And in the Draw() method, call the menu's draw function:
mainMenu.Draw(gameTime);
If the menu isn't visible, those functions will do nothing. To show the menu, you set the visible property to true. I do this in the Update method when the user pressed escape:
if (keyboardState.IsKeyDown(Keys.Escape) && !prevKeyBoardState.IsKeyDown(Keys.Escape))
{
mainMenu.visible = !mainMenu.visible;
}
And finally, when a menu choice is executed, you handle it as follows:
public void ChoiceExecuted(object source, Menu.MenuEvent e)
{
if (e.choiceString == "Show Sprite")
{
mainMenu.visible = false;
}
else if (e.choiceString == "Return")
{
mainMenu.visible = false;
}
}
All I'm doing in the sample code is hiding the menu, but you can do anything in there. There are also choiceSelected and choiceDeselected events, and they get fired in the current code.
My next update to this code should have the ability to navigate through menu pages, and the ability to give the user some left/right choices as far as options go (a "Sound On Off" menu choice, for example).
Tuesday, March 11, 2008
Quick Update
I haven't posted my menu system yet because I've been working on some programming problems "someone" asked me to work on ;). I also moved into my new place this weekend, so I've been extra busy. I hope to be done with these top secret programming problems by tonight. Hopefully I'll be able to post some code for my menu system by the end of the week.
I was looking at some other XNA code yesterday, and I think I need to look into spriteFonts. I might be able to use those instead of the bitmap font class I'm using now. spriteFonts are built in to XNA, so they might be faster. I'll have an easier time modifying the font type, that's for sure. More later this week...
I was looking at some other XNA code yesterday, and I think I need to look into spriteFonts. I might be able to use those instead of the bitmap font class I'm using now. spriteFonts are built in to XNA, so they might be faster. I'll have an easier time modifying the font type, that's for sure. More later this week...
Thursday, March 6, 2008
Menu System, Continued
Okay, the menu system is coming a long nicely. I've got it displaying on the screen where I want it, and it is doing the collision detection work to select options with the mouse and keyboard. I'll save the events for tomorrow.
The only change to the below code is that you have to pass the Game class when you create the menu (I've created the menu system as a DrawableGameComponent):
I'm using a bitmap font class that I got here to do the work of displaying the text. The only problem I can see with using this class is that it will force me into a certain font... It's pretty well designed though, so it has made it a lot easier to get going. I'll have to visit different fonts later. Right now, Times New Roman is my best friend.
The only change to the below code is that you have to pass the Game class when you create the menu (I've created the menu system as a DrawableGameComponent):
menu = new Menu(this);
I'm using a bitmap font class that I got here to do the work of displaying the text. The only problem I can see with using this class is that it will force me into a certain font... It's pretty well designed though, so it has made it a lot easier to get going. I'll have to visit different fonts later. Right now, Times New Roman is my best friend.
Wednesday, March 5, 2008
Designing a Menu System
Well, it's 2am and I've been plugging away at what I think will be a useful menu system. We'll have to just wait and see when I've got it finished. I'm basing the architecture on the way a TreeView works in C#, and my goal is that the following code will initialize a menu:
Menu menu = new Menu();
menu.AddChoice("New Game");
menu.AddChoice("Load Game");
MenuChoice OptionsMenu = menu.AddChoice("Options");
OptionsMenu.AddChoice("Resolution");
OptionsMenu.AddChoice("Volume");
menu.NodeSelectedEvent += new Menu.ChoiceExecutedHandler(ChoiceExecuted);
We'll see what I end up with. Hopefully it won't get too cluttered with code related to drawing the darn thing.
Monday, March 3, 2008
Some Changes and Updates
I've just changed my blog size to be a little wider. I was getting tired of my code being all squished. Also, I'm using the Visual Studio 2005 add-in CopySourceAsHtml to display code in my posts. After getting it set up, you can just copy and paste right into the blogger post editor.
XNA - How to Disable Bitmap Magnification Blending (Blur)
In working on my code for Conway's Game of Life, I ran into a problem with the default bitmap scaling behavior in XNA. I'm generating a bitmap that I scale to the size of the window. When this bitmap is displayed, it is shown as a blurry mess:
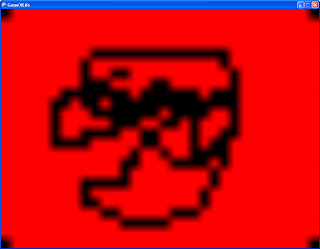
Removing that doggone blending is actually quite simple. You have to modify your spriteBatch.begin() call, and modify the graphics device settings immediately after, like so:
The key in the spriteBatch.Begin() call is the SpriteSortMode. Setting this value to immediate causes any changes to the graphics device to be applied immediately. And we want to make a change, as you can see in the next line of code. I'm changing the magnification filter to TextureFilter.None because I don't want it to blue anything. After this, you draw and scale your sprites like normal. The result looks like this:

ahh... much better!

Removing that doggone blending is actually quite simple. You have to modify your spriteBatch.begin() call, and modify the graphics device settings immediately after, like so:
spriteBatch.Begin(SpriteBlendMode.AlphaBlend,
SpriteSortMode.Immediate, SaveStateMode.None);
graphics.GraphicsDevice.SamplerStates[0].MagFilter = TextureFilter.None;
The key in the spriteBatch.Begin() call is the SpriteSortMode. Setting this value to immediate causes any changes to the graphics device to be applied immediately. And we want to make a change, as you can see in the next line of code. I'm changing the magnification filter to TextureFilter.None because I don't want it to blue anything. After this, you draw and scale your sprites like normal. The result looks like this:

ahh... much better!
Sunday, March 2, 2008
Displaying a Mouse Pointer in XNA
XNA doesn't automatically show you a mouse pointer within the game window. Solving this is easy. First, you need a position for your mouse. You'll also need a 2d texture to display as your mouse pointer. Declare this within your game class:
Be sure to initialize it to zero. For simplicity, I also generate a simple red square texture to use as the mouse pointer. I'm doing all of this in the Initialize() function. In my (very short) experience with XNA, you'd want to initialize textures in the LoadContent() function, but this is not loading from a file, so it's safe to do it all in the Initialize() function like this:
Now, in the Update() function, update your mouse position:
And finally, in the Draw() function, draw your sprite in a spritebatch:
Grab the sample project for this here.
Texture2D m_mouseTexture;
Vector2 m_mousePos;
Be sure to initialize it to zero. For simplicity, I also generate a simple red square texture to use as the mouse pointer. I'm doing all of this in the Initialize() function. In my (very short) experience with XNA, you'd want to initialize textures in the LoadContent() function, but this is not loading from a file, so it's safe to do it all in the Initialize() function like this:
m_mousePos = Vector2.Zero;
m_mouseTexture = new Texture2D(graphics.GraphicsDevice, (int)POINTSIZE, (int)POINTSIZE, 1, TextureUsage.None, SurfaceFormat.Color);
Color[] texture = new Color[POINTSIZE * POINTSIZE];
for (int i = 0; i < texture.Length; ++i)
{
texture[i] = Color.Red;
}
m_mouseTexture.SetData(texture);
Now, in the Update() function, update your mouse position:
MouseState mouseState = Mouse.GetState();
m_mousePos.X = mouseState.X;
m_mousePos.Y = mouseState.Y;
And finally, in the Draw() function, draw your sprite in a spritebatch:
spriteBatch.Begin();
spriteBatch.Draw(m_mouseTexture, m_mousePos, null, Color.White, 0f,
Vector2.Zero, 1.0f, SpriteEffects.None, 0f);
spriteBatch.End();
Grab the sample project for this here.
Saturday, March 1, 2008
Conway's Game of Life

I thought I should talk a little about the project I'm focusing on right now. I'm still spinning up on XNA, and I was reading an article somewhere recently that mentioned Conway's Game of Life. I was never taught about this in school for some reason. What a wonderful little thing!
Anyways, I thought it would be fun to implement Conway's Game of Life in XNA to give myself something tangible (in the software sense... what does that really mean, anyways?) to work on. I've already got a basic architecture done, but I want to write down some of the guidelines I'm trying to stick to. Just basic stuff, like:
What am I trying to learn?
- I want to learn about what it will take to implement a menu system in XNA.
- I want to learn about mouse interaction with an object (the game board) on the screen.
Which Game of Life algorithm should I use?
- a few are mentioned on the wiki page, notably hashlife. Since I'm not trying to learn about Game of Life specifics, I'm going to start with brute force with two 2d arrays (one for the current interation, and one for the next). It will give me a good quick start on my goal, and also give me a good baseline if I decide to optimize the algorithm.
What operations should I allow?
- a mouse click should turn a cell on or off. Hold and drag to fill or unfill cells under the mouse pointer
- spacebar should step to the next iteration.
- enter should run through iterations at the chosen speed (we'll need a menu for that).
What should the menu contain?
- Options
- run speed
- window size
- colors?
- I'll leave any other nifty stuff for later.
Things that would be very interesting to implement:
- the ability to move and zoom the camera around the grid with the mouse or keyboard
- some logic to move and zoom the camera automatically, and follow the most activity in the grid. One nasty corner case for this is any gliders that come off of the high activity areas. how do i know when to ignore them?
More to come later when I have more of this implemented.
Friday, February 29, 2008
Yet Another Book
 I got my new "Essential Mathematics for Games and Interactive Applications" book today. I have a feeling I'm going to wear it out as time goes on. It seems like it will be a really great asset for any of my graphics needs.
As time goes on, I'm going to force myself to learn how to use this darned blogger. I've always just trusted it as text entry and nothing more, but I'm sure it can do more. Thus, the nice photo of the book I just bought.
OpenGL SuperBible: Chapter 1
I read through the introduction and chapter 1 of the OpenGL SuperBible. It was 100% review, but it's well written, so I just went with it. I remember enjoying reading my OpenGL book in college, and I really enjoy the author of this book as well. There's something about graphics programmers, I guess. They're not 100% engineer. They know how to put graphics together, and I guess that bleeds over into other less technical tasks, like arranging words on a page. Come to think of it, my OpenGL teacher was pretty entertaining, too. He looked like the neighbor dad from Honey, I Shrunk the Kids, and that amused me.
Thursday, February 28, 2008
New Books
I got some new books from Amazon today, the 3ds Max 2008 Bible, and the even more blasphemous OpenGL SUPERBible. I'm excited to start reading. There just isn't enough time. I'm gonna have to put together some sort of schedule. So far I've just been promising myself to work on SOMETHING everyday (XNA, website, graphics, math, etc). It's getting to a point where I'm gonna have to start consciously dividing my time. It will get worse tomorrow when I get yet Another book...
Dreamweaver and my new webpage
I've never really used Dreamweaver before. Every time I started with it, I'd get frustrated and just end up using Microsoft FrontPage. For basic text, it makes more sense. I mention this because I forced myself to figure out Dreamweaver for my latest webpage. And I'm glad I did, because it also forced me to finally figure out CSS and the the importance of div.
I actually went to this page while I was building this page. I just couldn't figure out how to add the divider! But it's not my fault I couldn't find the command, it the fault of the UI designer :D. And by the way, I'd like to mention that my new apartment has a stove that looks like this. I'm very proud of this fact.
I actually went to this page while I was building this page. I just couldn't figure out how to add the divider! But it's not my fault I couldn't find the command, it the fault of the UI designer :D. And by the way, I'd like to mention that my new apartment has a stove that looks like this. I'm very proud of this fact.
Wednesday, February 27, 2008
Updating the Wizard
Well, I felt bad about saying that the wizard tutorial didn't end well, so I've modified it a bit to work like I would expect. You can get the original project here. My updated project is available here. The main modification is to throw out a lot of the state related code. The original list of states is:
//The various states the Wizard can be in
protected enum WizardState
{
Standing,
Walking,
Magicking,
Ducking,
Jumping
}//End enum WizardState
I've replace them with
//The various states the Wizard can be in
protected enum WizardState
{
Normal,
Ducking,
Jumping
}//End enum WizardState
In the original project, the code only allows for one state at a time, so you end up not being able to walk when jumping, or magick while walking or jumping. So i took the actions i wanted to be able to do during all times, specifically walking and magicking, and moved those out of the state enum. They shouldn't be treated as states. They're just actions the wizard can take. Then I realized there needed to be some sort of base state, so I added the Normal state, which is just the default.
The other big change is in the UpdateKeyboard function. Instead of an if..else if...else if chain of code, I changed it to a series of if statements so the UpdateKeyboard function will respond to all keys being pressed at once, rather than responding to one and returning.
One final minor change I made was to pull out the crouch animation when the wizard lands. I didn't like it. I've avoided posting code in here until I know how to get it formatted correctly... another action item, I suppose.
The end result, if you build my version of the project, is a wizard that can move and magick while jumping. It feels much more responsive, and makes me feel like I have a lot more control over the wizard.
There. I feel better now.
//The various states the Wizard can be in
protected enum WizardState
{
Standing,
Walking,
Magicking,
Ducking,
Jumping
}//End enum WizardState
I've replace them with
//The various states the Wizard can be in
protected enum WizardState
{
Normal,
Ducking,
Jumping
}//End enum WizardState
In the original project, the code only allows for one state at a time, so you end up not being able to walk when jumping, or magick while walking or jumping. So i took the actions i wanted to be able to do during all times, specifically walking and magicking, and moved those out of the state enum. They shouldn't be treated as states. They're just actions the wizard can take. Then I realized there needed to be some sort of base state, so I added the Normal state, which is just the default.
The other big change is in the UpdateKeyboard function. Instead of an if..else if...else if chain of code, I changed it to a series of if statements so the UpdateKeyboard function will respond to all keys being pressed at once, rather than responding to one and returning.
One final minor change I made was to pull out the crouch animation when the wizard lands. I didn't like it. I've avoided posting code in here until I know how to get it formatted correctly... another action item, I suppose.
The end result, if you build my version of the project, is a wizard that can move and magick while jumping. It feels much more responsive, and makes me feel like I have a lot more control over the wizard.
There. I feel better now.
Tuesday, February 26, 2008
Catching Up
I should have started this blog a while ago, because it helps your brain remember things if you flesh it out on paper.
I recently went through a tutorial called The Wizard. I think i can safely say that I didn't like it. The design of the project starts out nicely. You've got your game, which has a wizard, which extends the Sprite class. Got it. They even go into spritesheets, of which the implementation details are new and useful to me. They talk about game states, and they are required for game design.
The code after that is... poor. What you end up with is a sprite you can move around on the screen, but which can only respond to a single command at a time. It's like those old games, like Dragon Warrior, where you'd press a button and the character would move, during which you couldn't do anything else. I don't think any new code should result in something like that. Even the most basic tutorials on the XNA site don't result in something like that. Then again, i bet this type of implementation would work well for a board game.
XNA Game Studio
I'm spending what free time i have studying XNA game studio 2.0. I didn't realize until recently that how wonderful XNA GSE is. I don't care what anyone says, I like Microsoft products, and this is no exception. The amount of online support for XNA is awesome, it's easy to get started, AND you can publish stuff to your Xbox (that's where it will cost you money, but it's only ~100/year). Very cool.
My First Post
Welcome to Luke Rymarz's blog. It's pretty boring here right now, but I'll have some more stuff later this week. My plan for this blog is to recount things I've learned in my software engineering career, so I can better lock them into my brain.
Subscribe to:
Posts (Atom)

